Thursday, November 3, 2011

ASPxGridView Hyperlink NavigateUrl at Runtime

In the ASPxHyperLink.Init handler, you can use the ASPxGridView.GetDetailRowKeyValue method with ASPxHyperLink.NamingContainer property as a parameter, to get the main grid row key value.

[C#]

protected void ASPxHyperLink1_Init(object sender, EventArgs e) {
ASPxHyperLink myLink =(ASPxHyperLink)sender;
int key = Convert.ToInt32(ASPxGridView.GetDetailRowKeyValue(myLink.NamingContainer));
}


It would be better to use a binding-expression for the ASPxHyperLink.NavigateUrl property in the .ASPX file.


[ASPx]


<EmptyDataRow>
<dx:ASPxHyperLink ID="ASPxHyperLink1" runat="server" Text="ASPxHyperLink"
NavigateUrl="<%# ASPxGridView.GetDetailRowKeyValue(Container) %>" />
</EmptyDataRow>

ASPxGridView DataRow Template Example

<%@ Page Language="C#" AutoEventWireup="true" CodeBehind="Default.aspx.cs" Inherits="WebApplication164._Default" %>

<%@ Register Assembly="DevExpress.Web.ASPxEditors.v8.3, Version=8.3.4.0, Culture=neutral, PublicKeyToken=b88d1754d700e49a"
Namespace="DevExpress.Web.ASPxEditors" TagPrefix="dxe" %>

<%@ Register Assembly="DevExpress.Web.ASPxGridView.v8.3, Version=8.3.4.0, Culture=neutral, PublicKeyToken=b88d1754d700e49a"
Namespace="DevExpress.Web.ASPxGridView" TagPrefix="dxwgv" %>

<!DOCTYPE html PUBLIC "-//W3C//DTD XHTML 1.0 Transitional//EN" "http://www.w3.org/TR/xhtml1/DTD/xhtml1-transitional.dtd">

<html xmlns="http://www.w3.org/1999/xhtml" >
<head runat="server">
<title>Untitled Page</title>
</head>
<body>
<form id="form1" runat="server">
<div>
<dxwgv:ASPxGridView ID="ASPxGridView1" runat="server" DataSourceID="AccessDataSource1" AutoGenerateColumns="False"
KeyFieldName="ID" ClientInstanceName="grid">
<Columns>
<dxwgv:GridViewDataTextColumn FieldName="ID" VisibleIndex="0">
</dxwgv:GridViewDataTextColumn>
<dxwgv:GridViewDataTextColumn FieldName="FirstName" VisibleIndex="1">
</dxwgv:GridViewDataTextColumn>
<dxwgv:GridViewDataTextColumn FieldName="LastName" VisibleIndex="2">
</dxwgv:GridViewDataTextColumn>
<dxwgv:GridViewDataTextColumn FieldName="Company" VisibleIndex="3">
</dxwgv:GridViewDataTextColumn>
<dxwgv:GridViewDataTextColumn FieldName="Address" VisibleIndex="4">
</dxwgv:GridViewDataTextColumn>
<dxwgv:GridViewDataTextColumn FieldName="City" VisibleIndex="5">
</dxwgv:GridViewDataTextColumn>
<dxwgv:GridViewDataTextColumn FieldName="State" VisibleIndex="6">
</dxwgv:GridViewDataTextColumn>
<dxwgv:GridViewDataTextColumn FieldName="ZipCode" VisibleIndex="7">
</dxwgv:GridViewDataTextColumn>
<dxwgv:GridViewDataTextColumn FieldName="HomePhone" VisibleIndex="8">
</dxwgv:GridViewDataTextColumn>
</Columns>
<Templates>
<DataRow>
<div style="padding:5px">
<table width="100%" style="background-color:Silver">
<tr><td>First Name:&nbsp;<%# Eval("FirstName") %>
</td><td>Last Name:&nbsp;<%# Eval("LastName") %>
</td></tr><tr><td colspan="2">
<table width="100%">
<tr><td>State:&nbsp;<%# Eval("State") %>
</td><td>City:&nbsp;<%# Eval("City") %>
</td><td>Address:&nbsp;<%# Eval("Address") %>
</td></tr></table>
</td></tr>
<tr><td colspan="2">Company:&nbsp;<%# Eval("Company") %>
</td></tr></table>
<dxe:ASPxButton ID="ASPxButton2" runat="server" Text="Edit" AutoPostBack="False"
ClientSideEvents-Click='<%# "function(s, e) { grid.StartEditRow(" + Container.VisibleIndex + "); }" %>'>
</dxe:ASPxButton>
</div>
</DataRow>
<StatusBar>
<dxe:ASPxButton ID="ASPxButton1" runat="server" Text="New" AutoPostBack="False"
ClientSideEvents-Click="function(s, e) { grid.AddNewRow(); }">
</dxe:ASPxButton>
</StatusBar>
<EditForm>
<div>
<table width="100%"
style="background-color:Silver"><tr><td>First Name:
<dxe:ASPxTextBox ID="ASPxTextBox1"
runat="server" Value='<%# Bind("FirstName") %>' Width="100%">
</dxe:ASPxTextBox>
</td><td>Last Name:
<dxe:ASPxTextBox ID="ASPxTextBox2" runat="server"
Value='<%# Bind("LastName") %>' Width="100%">
</dxe:ASPxTextBox>
</td></tr><tr><td colspan="2">
<table width="100%"><tr><td>State:
<dxe:ASPxTextBox
ID="ASPxTextBox3" runat="server" Value='<%# Bind("State") %>' Width="100%">
</dxe:ASPxTextBox>
</td><td>City:
<dxe:ASPxTextBox ID="ASPxTextBox4" runat="server"
Value='<%# Bind("City") %>' Width="100%">
</dxe:ASPxTextBox>
</td><td>Address:
<dxe:ASPxTextBox ID="ASPxTextBox5"
runat="server" Value='<%# Bind("Address") %>' Width="100%">
</dxe:ASPxTextBox>
</td></tr></table>
</td></tr><tr><td colspan="2">Company:
<dxe:ASPxTextBox
ID="ASPxTextBox6" runat="server" Value='<%# Bind("Company") %>' Width="100%">
</dxe:ASPxTextBox>
</td></tr></table>
</div>
<dxwgv:ASPxGridViewTemplateReplacement runat="server" ReplacementType="EditFormUpdateButton" />
<dxwgv:ASPxGridViewTemplateReplacement runat="server" ReplacementType="EditFormCancelButton" />
</EditForm>
</Templates>
<Settings ShowColumnHeaders="False" ShowStatusBar="Visible" />
<SettingsEditing Mode="EditForm" />
</dxwgv:ASPxGridView>
<asp:AccessDataSource ID="AccessDataSource1" runat="server" DataFile="~/App_Data/Contacts.mdb"
SelectCommand="SELECT * FROM [Customers]"></asp:AccessDataSource>

</div>
</form>
</body>
</html>


To provide editing capabilities you can add the ASPxButton into the DataRow template. Set its AutoPostBack property to False, and attach a script to the client-side Click event. In the script, call the ASPxClientGridView.StartEditRow method, and pass the current row visible index in argument. Use the Container.VisibleIndex property from inline code to get the index.

To add new rows, add a similar button to the StatusBar template, and call the ASPxClientGridView.AddNewRow method in its Click event.


You can get some functionality using the Container object like  Container.KeyValue, Container.VisibleIndex.


Along this formatting in the text is also possible through sever side code calling e.g. String.Format


<dx:ASPxLabel ID="BirthDateLabel" runat="server" Text='<%# String.Format("{0:d}",
Eval("BirthDate")) %>' />


Another example of DataRow Template :


<div>

<dxwgv:ASPxGridView ID="ASPxGridView1" runat="server"

AutoGenerateColumns="False" DataSourceID="AccessDataSource1"

KeyFieldName="CustomerID" ClientInstanceName="grid">

<SettingsEditing Mode="Inline" />

<Columns>

<dxwgv:GridViewCommandColumn VisibleIndex="0">

<EditButton Visible="True">

</EditButton>

</dxwgv:GridViewCommandColumn>

<dxwgv:GridViewDataTextColumn FieldName="CustomerID" ReadOnly="True"

VisibleIndex="1">

</dxwgv:GridViewDataTextColumn>

<dxwgv:GridViewDataTextColumn FieldName="CompanyName" VisibleIndex="2">

</dxwgv:GridViewDataTextColumn>

<dxwgv:GridViewDataTextColumn FieldName="City" VisibleIndex="3">

</dxwgv:GridViewDataTextColumn>

<dxwgv:GridViewDataTextColumn FieldName="Country" VisibleIndex="4">

</dxwgv:GridViewDataTextColumn>

</Columns>

<SettingsPager PageSize="5" />

<Templates>

<DataRow>

<div style="padding:5px">

<table border="1" cellpadding="2" cellspacing="1" width="100%">

<tr>

<td width="150px" rowspan="4"><a href="#" onclick="grid.AddNewRow();">New</a>

<a href="##" onclick="grid.StartEditRow(<%# Container.VisibleIndex %>);">Edit</a>

<a href="###" onclick="grid.DeleteRow(<%# Container.VisibleIndex %>);">Delete</a></td>

<td width="300px"></td>

<td></td>

</tr>

<tr>

<td>CompanyName</td>

<td><%# Eval("CompanyName")%></td>

</tr>

<tr>

<td>City</td>

<td><%# Eval("City")%></td>

</tr>

<tr>

<td>Country</td>

<td ><%# Eval("Country")%></td>

</tr>

</table>

</div>

</DataRow>

</Templates>

</dxwgv:ASPxGridView>

<asp:AccessDataSource ID="AccessDataSource1" runat="server"

DataFile="~/App_Data/nwind.mdb"

DeleteCommand="DELETE FROM [Customers] WHERE [CustomerID] = ?"

InsertCommand="INSERT INTO [Customers] ([CustomerID], [CompanyName], [City], [Country]) VALUES (?, ?, ?, ?)"

SelectCommand="SELECT [CustomerID], [CompanyName], [City], [Country] FROM [Customers]"

UpdateCommand="UPDATE [Customers] SET [CompanyName] = ?, [City] = ?, [Country] = ? WHERE [CustomerID] = ?">

<DeleteParameters>

<asp:Parameter Name="CustomerID" Type="String" />

</DeleteParameters>

<UpdateParameters>

<asp:Parameter Name="CompanyName" Type="String" />

<asp:Parameter Name="City" Type="String" />

<asp:Parameter Name="Country" Type="String" />

<asp:Parameter Name="CustomerID" Type="String" />

</UpdateParameters>

<InsertParameters>

<asp:Parameter Name="CustomerID" Type="String" />

<asp:Parameter Name="CompanyName" Type="String" />

<asp:Parameter Name="City" Type="String" />

<asp:Parameter Name="Country" Type="String" />

</InsertParameters>

</asp:AccessDataSource>

</div>

Wednesday, November 2, 2011

How to refresh a ASPxGridView summary value on the client side

The ASPxGridView is a server side control, so it renders on the server side.

If you know how the summary value should be changed using the client side code, you need to do the following:

1) add the ASPxLabel to the column's FooterTemplate container and set its ClientInstanceName to a some value, for example, lblFooter;
2) use the lblFooter.SetText('some text') to change the displayed summary value.

Here is some sample code:

[ASPx]

<dx:GridViewDataTextColumn FieldName="CategoryID" ReadOnly="True" VisibleIndex="1">
<EditFormSettings Visible="False" />
<FooterTemplate>
<dx:ASPxLabel ID="ASPxLabel1" ClientInstanceName ="lblFooter" runat="server"
Text="<%# GetSummaryValue(Container)%>">
</dx:ASPxLabel>
</FooterTemplate>
</dx:GridViewDataTextColumn>
....


[C#]


protected string GetSummaryValue(GridViewFooterCellTemplateContainer container) {
ASPxGridView gridView = container.Grid;
GridViewDataColumn column = container.Column as GridViewDataColumn;
if(column == null)
return string.Empty;
for(int i = 0; i < gridView.TotalSummary.Count; i ++)
if(gridView.TotalSummary[i].FieldName == column.FieldName) {
return gridView.GetTotalSummaryValue(gridView.TotalSummary[i]).ToString();
}
return string.Empty;
}

How User Controls Are Processed

The HTML portion of ASP.NET Web pages can contain a mix of Web controls, user controls, and HTML syntax. When an ASP.NET Web page is visited for the first time, or for the first time after a change has been made to the HTML portion of the Web page, a class is automatically created from the HTML portion. This class, which is derived from the Web page's code-behind class, constructs the Web page's control hierarchy based on the declarative syntax in the HTML portion.

For example, imagine that a Web page had the following markup in its HTML portion:

<html>
<body>
<form runat="server">

Name: <asp:TextBox runat="server" id="name"></asp:TextBox>
<br />
<asp:Button runat="server" Text="Submit"></asp:Button>

</form>
</body>
</html>


This would generate the following control hierarchy:


clip_image001


Figure 2. Controls hierarchy on page


Notice that the HTML markup is converted into LiteralControl instances, the Web Form into an HtmlForm object, and the TextBox and Button Web controls into their respective classes.


Once this control hierarchy is created, the ASP.NET Web page can be rendered by recursively invoking the RenderControl(HtmlTextWriter) method of each of the controls in the hierarchy. When a control's RenderControl(HtmlTextWriter) method is invoked, the control generates its HTML markup and appends it to the HtmlTextWriter object. Realize that each time an ASP.NET Web page is requested, the page's corresponding class is invoked causing the control hierarchy to be created and rendered.


User controls work in a similar fashion to ASP.NET Web pages. When a user control is visited for the first time, or for the first time after the HTML portion has been changed, the user control is compiled into a class that is derived from the user control's code-behind class. Like the ASP.NET Web page's autogenerated class, the user control's autogenerated class constructs a control hierarchy based on the HTML portion of the user control. In essence, a user control has its own control hierarchy.


Imagine, then, that we had a user control with the following HTML markup:


<asp:Label runat="server" id="lblCategoryName"></asp:Label>

<br />

<asp:Label runat="server" id="Description"></asp:Label>


The user control's control hierarchy, then, would look like the following:
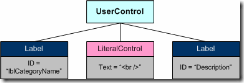


clip_image002


Figure 3. Control Hierarchy for user control


Recall that an ASP.NET Web page's HTML portion can contain not only Web controls and HTML syntax, but user controls as well. user controls are entered into the control hierarchy as an instance of the user control's auto generated class. So, imagine we augmented our previous ASP.NET Web page example so that after the Button Web control was an instance of the user control whose declarative syntax we just discussed. This would cause the Web page's control hierarchy to look like the following:


clip_image003


Figure 4. Updated control hierarchy for page


After the user control class is added to the control hierarchy, the class's InitializeAsUserControl(Page) method is invoked. The InitializeAsUserControl(Page) method is defined in the System.Web.UI.UserControl class, which the autogenerated user control class is derived from indirectly. (Recall that the autogenerated user control class is derived from the user control's code-behind class; this code-behind class is derived from System.Web.UI.UserControl, similar to how an ASP.NET Web page's code-behind class is derived from System.Web.UI.Page.) The InitializeAsUserControl(Page) method generates the user control's class hierarchy and assigns the user control's Page property to the passed in Page instance, thereby allowing the user control to programmatically reference the Page to which it belongs. After InitializeAsUserControl(Page) runs, the Web page's control hierarchy looks like:


clip_image004


Figure 5. Updated page hierarchy after initializing the user control


Notice that once the user control is affixed to the control hierarchy and builds up its own control hierarchy, the page's control hierarchy appears just as it would if a user control hadn't been used, but instead had its HTML portion entered directly into the page's HTML portion. With this complete hierarchy, the Web page can be rendered by recursively calling the RenderControl(HtmlTextWriter) method of each control in the hierarchy.


Now that we've seen how a user control is handled underneath the covers, let's take a look at some of the more advanced concepts of user controls, starting with how to respond to events raised by Web controls in a user control.

Creating Arrary in JavaScript

Create an Array

An array can be defined in three ways.
The following code creates an Array object called myCars:
Listing 1:
var myCars=new Array(); // regular array (add an optional integer
myCars[0]="Saab";       // argument to control array's size)
myCars[1]="Volvo";
myCars[2]="BMW";
Listing 2:

var myCars=new Array("Saab","Volvo","BMW"); // condensed array

Listing 3:

var myCars=["Saab","Volvo","BMW"]; // literal array

Note: If you specify numbers or true/false values inside the array then the variable type will be Number or Boolean, instead of String.

Access an Array


You can refer to a particular element in an array by referring to the name of the array and the index number. The index number starts at 0.

The following code line:
document.write(myCars[0]);
will result in the following output:
Saab

Modify Values in an Array


To modify a value in an existing array, just add a new value to the array with a specified index number:
myCars[0]="Opel";

Now, the following code line:
document.write(myCars[0]);


will result in the following output:
Opel

Opening a New Window With JavaScript

Use Window open() Method.
The open() method opens a new browser window.

Syntax

window.open(URL,name,specs,replace)

Parameter
URL

Optional. Specifies the URL of the page to open. If no URL is specified, a new window with about:blank is opened
name
Optional. Specifies the target attribute or the name of the window. The following values are supported:

  • _blank - URL is loaded into a new window. This is default
  • _parent - URL is loaded into the parent frame
  • _self - URL replaces the current page
  • _top - URL replaces any framesets that may be loaded
  • name - The name of the window ‘
<html>
<head>
<script type="text/javascript">
function open_win()
{
window.open(http://www.niranjankala.in”)
}
</script>
</head>
<body>
<input type=button value="Open Window" onclick="open_win()" />
</body>
</html>

Thursday, October 20, 2011

Client side Validation on submit with javascript and aspxtextbox

DevExpress controls own validation mechanism. Specify textbox validation group property under validationsettings to string value that you want to use and specify in the ValidationGroup method as parameter.

you can raise validation check from client side event of any button using devepress client side framework as:

OnClientClick="return ASPxClientEdit.ValidateGroup('validationgroupname');

Here is the code snippet to explain:

User Name:
            <dxe:ASPxTextBox ID="tbUserName" runat="server" Width="170px">
                <ValidationSettings SetFocusOnError="True">
                    <RequiredField IsRequired="True" ErrorText="User name can't be empty" />
                </ValidationSettings>
            </dxe:ASPxTextBox>
            Password:
            <dxe:ASPxTextBox ID="tbPassword" runat="server" Width="170px" Password="True">
                <ValidationSettings SetFocusOnError="True">
                    <RequiredField IsRequired="True" ErrorText="Password can't be empty" 
                     ValidationGroup="MYGroup"/>
                </ValidationSettings>
            </dxe:ASPxTextBox>
            Last Name:
            <dxe:ASPxTextBox ID="tbLastName" runat="server" Width="170px">
                <ValidationSettings SetFocusOnError="True">
                    <RequiredField IsRequired="True" ErrorText="Last name can't be empty" />
                </ValidationSettings>
            </dxe:ASPxTextBox>
            First Name:
            <dxe:ASPxTextBox ID="tbFirstName" runat="server" Width="170px">
                <ValidationSettings SetFocusOnError="True">
                    <RequiredField IsRequired="True" ErrorText="First name can't be empty" />
                </ValidationSettings>
            </dxe:ASPxTextBox>
            <br />
<asp:Button ID="btnSumbit" runat="server" Text="Submit" OnClientClick="return 
ASPxClientEdit.ValidateGroup('MYGroup');" />

Now it will validate on tbPassword. no others because they do not match validationgroup.