Showing posts with label IIS. Show all posts

Saturday, November 12, 2011

Running classic ASP on IIS 7


It's not really difficult to run classic ASP on Internet Information Server 7, but there are some bumps down the road. Here's a little help to get you started:

First of all, check whether you have the Windows feature for ASP installed. Go to Programs and Features in Control Panel and click Turn Windows features on and off. Navigate down the tree of features and make sure ASP is checked.

ASPWindowsFeature

Next, go to Internet Information Server (IIS) Manager (run inetmgr from the Start Search box to get there fast) and create a new application pool for ASP.

ASPApplicationPool

This should be a "No managed code" and "Classic" app pool if you do not intend to mix and match the .NET Framework and ASP.NET in the same pool. The Integrated pipeline would not make sense, because it only applies to integrating HTTP modules that are either native or managed .NET implementations.

I had some difficulties setting the identity of the application pool to the new built-in IUSR account. This account replaces the former computer account called IUSR_machinename. Same goes for the IIS_WPG group for application pools that is replaced by the builtin group IIS_IUSRS. Read more about it here. Under the Advanced Settings of the "ASP" application pool you will find the Identity property under Process Model. The default value is NetworkService. I found no way to set this to the BUILTIN\IUSR by choosing SpecificUser and setting BUILTIN\USR under Identity SpecificUser Credentials. I guess that you shouldn't be running ASP sites under IUSR anymore. It is used for anonymous users automatically.

ASPIUSRIdentity

To easy the administration effort, there is a way to turn off the IUSR account without turning off anonymous identification:

appcmd set config -section:anonymousAuthentication -userName:"" --password

And lastly, create your new web application. For example, copy the ASP site folder under C:\inetpub\wwwroot, where the default installation location of "Default Web Site" of IIS. Convert the folder (or virtual directory) to an application and choose "ASP" as the application pool. Check whether the .asp extension is mapped to the correct handler and whether it is enabled. Also make sure that the identity of your application pool has sufficient rights (and no more than that) to access the files in the web site's folder.

IISASPEnabled

One final note: whenever there is a error in the ASP website, and you get this error message: "An error occurred on the server when processing the URL. Please contact the system administrator",

ASPErrorMessage

it's probably because by default no error messages are sent to the client in IIS7. Change the setting "Send Errors To Browser" of your web application under the ASP icon to reveal such errors.

ASPReturnErrorMessages

Side note: if you get the nice Internet Explorer 500 error message and no particular details at all, remember to uncheck the "Show friendly HTTP error messages" checkbox under Internet Options, Advanced of IE.

Wednesday, November 9, 2011

How to install PHP on Windows 7 with IIS 7 via FastCGI

In this programming tutorial, we will learn how to install and configure PHP on windows 7 with IIS 7 via FastCGI. After release of php 5.3 version because php5isapi.dll is no longer available in the php releases starting from 5.3. So my recommendation is with the world’s recommendation and that is to use "FastCGI". Please consider following points before installing PHP on Windows 7.

The FastCGI module in IIS enables popular application frameworks that support the FastCGI protocol to be hosted on the IIS Web server in a high performance and reliable way. FastCGI provides a high-performance alternative to the Common Gateway Interface (CGI), which is a standard way of interfacing external applications with Web servers that has been a part of the supported IIS feature set since the first release.

  1. First of all check the system type; either it is 32 bit or 64 bit. X86 means 32 bit. X64 means 64 bit. Download the appropriate php version according to your system type.
  2. If you are using PHP with IIS you should use the VC9 versions of PHP.
  3. A Thread Safe version should be used if you install PHP as an Apache module. The Non Thread Safe version should be used if you install PHP as a CGI binary.
  4. Non-thread-safe build of PHP is recommended for PHP 5.3 version when using IIS. The non-thread-safe builds are available at » PHP for Windows: Binaries and Sources Releases.

Note:
VC9 Versions are compiled with the Visual Studio 2008 compiler and have improvements in performance and stability. The VC9 versions require you to have the » Microsoft 2008 C++ Runtime (x86) or the » Microsoft 2008 C++ Runtime (x64) installed. If you have visual studio 2008 install then you don't have to install Microsoft 2008 C++ Runtime.

What is FastCGI?
FastCGI is a standard protocol that allows the CGI executable files for application frameworks to interface with the Web server. It is different to the standard CGI protocol in that FastCGI reuses CGI processes for multiple requests, which provides a significant performance boost as compared to CGI. Support for IIS FastCGI enables IIS to host normal CGI programs like PHP or Ruby on Rails by using the FastCGI protocol, and to offer high performance and stability for production deployment of such application frameworks.
For having the IIS FastCGI support, you must have following things:
  • IIS Web server
  • IIS FastCGI extension
  • CGI program (such as php-cgi.exe)
The Web server dispatches HTTP requests to your application to the FastCGI component, which in turn launches the CGI program executable, and forwards the request for processing. Once the request is finished and the response is returned back to the server and sent to the client, the CGI process is reused for a subsequent request. This helps to avoid the high performance penalty of starting a new process for each request, which results in better performance and scalability in a production environment. Now let’s come to the topic.

Install PHP on Windows 7 with IIS 7 via FastCGI
First of all, definitely you need to have PHP. Go to the PHP download page and get the latest non-thread-safe ZIP archive of windows binaries for Windows. As of writing this, the package is called "PHP 5.3 (5.3.6) Non-thread-safe zip package". Unzip the archive to a folder on your hard disk. I use C:\php5.

In the latest version of php, you will not find any php.ini-recommended file in php directory. php.ini-recommended is replaced by php.ini-development and php.ini-production files. php.ini-production is used for production systems; for development systems you should use php.ini-development.

Open the php.ini-development and save as php.ini in the same folder and then use the following configuration setting.
Uncomment cgi.force_redirect by removing preceding; and then set it as cgi.force_redirect = 0

This directive is required for running under IIS. It is a directory security facility required by many other web servers. However, enabling it under IIS will cause the PHP engine to fail on Windows.
It is the minimum setting you need to change so that PHP can work with IIS.

Additionally, you may want to use
Uncomment cgi.fix_pathinfo by removing preceding; and then set it as cgi.fix_pathinfo = 1
This lets PHP access real path info following the CGI Spec. The IIS FastCGI implementation needs this set.
Uncomment fastcgi.impersonate by removing preceding; and then set it as fastcgi.impersonate = 1
FastCGI under IIS supports the ability to impersonate security tokens of the calling client. This allows IIS to define the security context that the request runs under.

Uncomment extension_dir by removing preceding; and then set it as extension_dir=C:\php5\ext.
The extension_dir needs to point to the directory where PHP extensions files are stored. The path can be absolute (i.e. "C:\PHP5\ext") or relative (i.e. ".\ext"). Extensions that are listed lower in the php.ini file need to be located in the extension_dir.

Note: - It is better approach to save php.ini in c:/windows as well.

PHP is now setup on your system. The next step is to choose a web server, and enable it to run PHP. We will go with IIS 7.
Internet Information Services (IIS) 7 is available on Windows Vista, Windows 7, and Windows Server 2008.
You probably heard a lot of bad things about IIS, from various groups. If you were holding off using IIS because of that well now is the time to re-evaluate IIS with version 7. A lot of the problems that plaques IIS were cured way back in IIS 5. Introduced in IIS 7 was a new architecture similar to Apache with its modules. Everything in IIS 7 is a module, an extension that can be removed. Just need a basic HTTP server? No problem! Just remove or deactivate everything but the HTTP service module.

Now let’s install IIS 7 if it is not installed in Windows 7. Go to the Start/Control Panel/Programs/Turn Windows Features on or off and check on the Internet Information Services entry. Activate the World Wide Web Services/Application Development Features/CGI node and also Web Management Tools/IIS Management Console (the latter not shown in the figure).
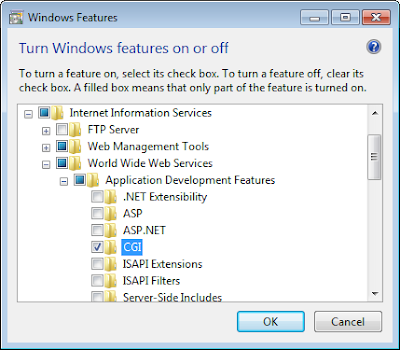
Installing PHP on Windows 7 - Step 1

Now, start the IIS Management Console; Open up the start menu, press windows+r to bring run dialog, type inetmgr and hit Enter. There, navigate to the Sites/Default Web Site/Handler Mappings node and double-click on the Handler Mappings entry.

Installing PHP on Windows 7 - Step 2

As a result of this, the Actions panel on the right hand side changes. You will now see an option called Add Module Mapping. Clicking on it brings a dialog which you fill out as you can see in the following figure (you may need to adapt the path used to your local system).
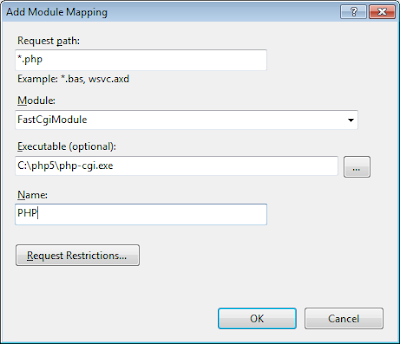
Installing PHP on Windows 7 - Step 3

If you do not see the FastCgiModule entry, you probably forgot to check the CGI node when installing IIS. Otherwise, close the Add Module Mapping dialog by pressing OK button. You need to confirm that you want to create a FastCGI application; click Yes.

Installing PHP on Windows 7 - Step 4

If you don't want to save php.ini in c:\windows then restart the IIS else Reboot your pc.
Finally, create a .php page and put it in the root folder (wwwroot) of the IIS site by default C:\Inetpub\wwwroot, e.g. phpinfo.php with a simple phpinfo() call in it like the code given below.

    <?php  
phpinfo();
?>


For Detailed information follow these links as reference:

Using FastCGI to Host PHP Applications on IIS 7


Configuring FastCGI to Host PHP Applications (IIS 7)

Wednesday, October 12, 2011

Failed to access IIS metabase.

Scenario:-
I have windows XP Professional installed on my machine and I got this error after
configuration of my virtual directory on IIS.

Server Error in '/myweb' Application.


Failed to access IIS metabase.

Description: An unhandled exception occurred during the execution of the current web request. Please review
the stack trace for more information about the error and where it originated in the code.

Exception Details: System.Web.Hosting.HostingEnvironmentException: Failed to access IIS metabase.

The process account used to run ASP.NET must have read access to the IIS metabase
(e.g. IIS://servername/W3SVC). For information on modifying metabase permissions,
please see http://support.microsoft.com/?kbid=267904.


Source Error:

An unhandled exception was generated during the execution of the current
web request. Information regarding the origin and location of the exception
can be identified using the exception stack trace below.


Stack Trace:

 
[HostingEnvironmentException: Failed to access IIS metabase.]
   System.Web.Configuration.MetabaseServerConfig.MapPathCaching(String siteID, VirtualPath path) +1076
   System.Web.Configuration.MetabaseServerConfig.System.Web.Configuration.IConfigMapPath2.MapPath(String siteID, VirtualPath vpath) +9
   System.Web.Hosting.HostingEnvironment.MapPathActual(VirtualPath virtualPath, Boolean permitNull) +301
   System.Web.Hosting.HostingEnvironment.MapPathInternal(VirtualPath virtualPath, Boolean permitNull) +51
   System.Web.CachedPathData.GetPhysicalPath(VirtualPath virtualPath) +39
   System.Web.CachedPathData.GetConfigPathData(String configPath) +704
   System.Web.CachedPathData.GetConfigPathData(String configPath) +583
   System.Web.CachedPathData.GetApplicationPathData() +38
   System.Web.CachedPathData.GetVirtualPathData(VirtualPath virtualPath, Boolean permitPathsOutsideApp) +8778063
   System.Web.Configuration.RuntimeConfig.GetConfig(VirtualPath path) +46
   System.Web.Configuration.RuntimeConfig.GetLKGRuntimeConfig(VirtualPath path) +96


Version Information: Microsoft .NET Framework Version:4.0.30319; ASP.NET Version:4.0.30319.1

Solution :-

This Error Caused Because You Not Have Register ASP.Net with IIS.
Please Follow Following Step to Regiser ASP.Net With IIS.


-> Go to Start - >  Run -> Cmd.


-> GO to Your System Drive Mostly C Drive.


-> Type C:\WINDOWS\Microsoft.NET\Framework\<your framework version directory>\aspnet_regiis -i

Just wait And Message comes Successfully Register.

Or you go to your visual studio command prompt in visual studio tools and run the same command

aspnet_regiis –i


Monday, September 12, 2011

Running a WebSite using IIS Express from the Command prompt and Visual Studio Integration

Open a command prompt.

You do not need administrator rights to users to execute commands in this tutorial. However, you must have administrator rights user to run IIS Express ports numbered 1024 or less.
    Run the following command to go to the IIS installation folder Express:

    cd \ Program Files \ IIS express

    or if you are using a 64-bit operating system, run the following command:

    cd \ Program Files (x86) \ IIS express
    Run the following command to see the chain of explicit use IIS:

    iisexpress /?

Express use IIS:
 ------------------
    iisexpress [/ config: config-file] [/ site: site-name] [/ siteid: site-id] [/ system tray: boolean]
    iisexpress / path: Application path [/ port: port-number] [/ clr: clr-version] [/ system tray: boolean]

   / Config: config-file
The full path to ApplicationHost.config. The default is the IISExpress8 \ Config \ ApplicationHost.config found in the user's My Documents folder.

  / Site: site-name
    The name of the launch site, as described in the file ApplicationHost.config.

    / Siteid: Site Identification
    The ID of the launch site, as described in the file ApplicationHost.config.
   / Path: implementation of the route
    The full path of physics application to run. You can not combine this option with the / config and the like.

 / Port: Serial Port
    The port that the application be attached. The default is 8080. You must also specify the / path.

  / Clr:. Clr-version of NET Framework (eg, v2.0) to use to run the application. The default is v4.0. You must also specify the / path.

 / System Tray: boolean
    Enables or disables the use of the system tray. The default is true.

    / Trace: trace level debugging
    Valid values
​​are information oi, ow warning, error or e.
    Examples:
    iisexpress / site: WebSite1
    This command runs WebSite1 site configuration file from the user profile.

    iisexpress / config: c: \ myconfig \ applicationhost.config
    This command runs the first site in the configuration file specified.

    iisexpress / path: c: \ myapp \ / port: 80
    This command runs the site in the folder c: \ myapp port 80.
    Run your site using one of the following:
        Use / config to run a site of a configuration file.

        See "Running your site from a configuration file" for more information.
        Use / path to run a site from the application folder.

        See "Running your website into the application" for more information.

    Note: The / path and the / config can not be combined.
    Once your site is running, you can use the IIS system tray express its management. For more information, see Using the Windows system tray to manage web sites and applications. Alternatively, you can disable the system tray by running the following:

    / System Tray: false

Running your site from a configuration file

IIS IIS Express and use the ApplicationHost.config file, which specifies the global configuration of sites, groups of applications, drivers, etc. Express IIS uses a default value, user-specific files to allow multiple ApplicationHost.config users share the same configuration computer without interfering with other users. This file is located in the% userprofile% \ Documents \ IISExpress \ Config or% userprofile% \ My Documents \ IISExpress \ config folder, depending on your operating system. When you run a site configuration file, you can specify the site running.

You can use the following commands:

    WebSite1 To run the website in the default configuration file, run:

    iisexpress / site: WebSite1
    To run the first website in the default configuration file, run:

    iisexpress
    To run the first website in a custom configuration file, run:

    iisexpress / config: c: \ myconfig \ applicationhost.config
    To run a site called My Blog of a custom configuration file, run:

    iisexpress / config: c: \ myconfig \ applicationhost.config / site: MyBlog

Note: the / config specifies the full path to the configuration file. You can skip this option if you want to use the default configuration file. The / site specifies a particular site in the configuration file. You can skip this option to run the first site in the configuration file.
Running your website into the application

You can also use the / path to run a site directly from a folder. This option works for any application, including static HTML, ASP.NET, PHP, and WCF. By default, IIS Express to run the site at http://localhost:8080/. A website manager, such as ASP.NET, IIS Express use. NET 4.0. You can use the port / and / clr options to replace the default values.

For example, the following command runs the specified application "frontend" in http://localhost:9090/ using NET 2.0.:

iisexpress / path: c: \ myapp \ / port: 9090 / clr: v2.0

 Integration with Visual Studio

IS Web Server for particular website:
IIS is the other option developers use when running and testing their applications with Visual Studio.  You can configure a web project within Visual Studio to use IIS by right-clicking on the project and pulling up its properties (and then by clicking on the “Web” tab within the properties window)":
image
Using IIS as your development server allows you to take full advantage of all web-server features (SSL, URL Rewrite Rules, etc).  IIS is a full-fledged web-server – which means you’ll get an experience closer to what it will work like when you deploy the application on a production server.
The downside with using the IIS option today, though, is that some companies don’t allow full web-servers to be installed on developer machines. IIS also requires administrator account access to setup and debug projects.  Different versions of Windows also support different versions of IIS.  For example, if you are running on Windows XP you have to use the IIS 5.1 web-server that comes with it – which doesn’t support all the new features of IIS 7.x.  Configuring a web project within VS to use IIS also requires some extra installation and configuration steps.

The VS 2010 Sp1, by itself, includes only the tooling in VS to support using IIS Express as the development server. So after installing Sp1, you will see that a new checkbox exists under Tools > Options > Projects and Solutions > Web Projects to use IIS Express for new websites and web projects, but this checkbox is disabled (see figure 1 below).

Figure 1 – IIS Express needs to be installed for Sp1 tooling to light-up

Use IIS Express in Tools-Options

Monday, December 27, 2010

How to enable the 64bit compatibility on IIS6 and IIS7?

Sometimes, you will get the following error after deploying your web application (developed for 64 bit
environment and if you referred to any GAC DLL in your application) on IIS 6 or IIS7.

Could not find the path of
C:\Windows\assembly\GAC_MSIL_<Dll Name>_<GAC ID>\Bin

This error occurs because of your IIS currently not supporting 64bit applications, so you need to enable
the 64bit
compatibility on IIS and you can resolve this by using the following steps on different IIS
versions based your
requirements.

For IIS6:
Step 1:  Click Start, click Run, type cmd, and then click OK.
Step 2:  Type the following command to disable the 32-bit mode:

cscript %SYSTEMDRIVE%\inetpub\adminscripts\adsutil.vbs 
SET  W3SVC/AppPools/Enable32bitAppOnWin64 0 
Step 3:  Type the following command to install the version of 
ASP.NET 2.0 and to install the script maps at the IIS
root and under:

%SYSTEMROOT%\Microsoft.NET\Framework64\v2.0.50727          
\aspnet_regiis.exe -i 
Step 4:  Make sure that the status of ASP.NET version 2.0.50727 
        is set to Allowed in the Web service extension list in
 Internet Information Services Manager(if your 
application deployed on windows 2003 or 2008).
For IIS7:
Step 1:  Open the Internet Information Service Manager  
from Start Menu or Control Panel --> Administrative 
Tools.
Step 2:  Expand  the Application Pools Node then find your Website 
Application Pool then right click on it  then click on 
Advanced Settings, it will popup the settings screen 
here you need to set false for Enable32bitApplication.
This settings may affect your existing 32bit application,
if you get any error on  your 32 applications then you 
reset the above setting and create a new application pool
just like existing on and use itfor 64bit with 
appropriate Enable32bitApplication setting(value must 
be false).

Tuesday, December 14, 2010

IIS URL Rewrite – Hosting multiple domains under one site

In a shared hosting environment, it's a common desire to have a single IIS website that handles multiple sites with different domain names.  This saves the cost of setting up additional sites with the hoster. 

At ORCS Web, we've supported this situation for many years using ISAPI Rewrite.  Now, with URL Rewrite for IIS 7, it's easier and it's integrated right into web.config.  In this blog post I'll set out to cover the essentials for hosting multiple domain names under a single account using URL Rewrite.

This post assumes that you are using URL Rewrite 1.0, 1.1 or 2.0.  I'll follow-up in a later post on more advanced ways to take this further yet, using the new features of URL Rewrite 2.0.

Part II will cover the outgoing rules available in URL Rewrite 2.0 to take this a step further.

First, the file structure

Let's lay out the directory structure for this example.  Assume that you have 3 domain names.  They are: masterdomain.com, site2.com and hawaiivisit.site2.com.  You've created your directory structure like this:

image

Let's assume that masterdomain.com was already in the root of the site and can't easily be moved.  However, site2.com and hawaiivisit.site.com need to be set up.  Each of these folders have a website within them.

Directing the domain name to the server

First, make sure that when you browse to the website by domain name, that it resolves to the correct IP address.  This is handled at the DNS level.  Your DNS entry for site2.com and hawaiivisit.site2.com will often be identical to masterdomain.com and are managed through your DNS provider.

Catching the site when on the server

If you host with a web hosting company then they will take care of this.  If you host yourself, make sure to set a site binding so that the expected site processes the domain name.  If you use host headers, be sure to add the extra bindings for them.

Redirecting the site to a subfolder

Now that you have the domain name directed to the server and site, URL Rewrite comes in to direct it to a subfolder.

First, make sure that your web host supports URL Rewrite on the server that you're hosted on.  The following assumes that it's installed and supported.

You can use IIS 7 Manager which gives a friendly interface for creating rules.  If you prefer to write them directly in web.config, I'll include the rules below.

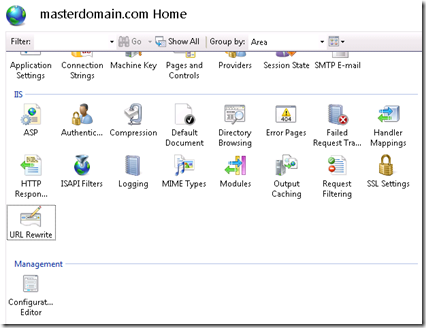
First, open up URL Rewrite:

image

I've come to prefer RegEx rules instead of wildcard rules.  I find that wildcard rules reach their limit pretty quickly.  Regular expressions can be daunting at first but it's pretty easy to pick up the basics.  Here's an excellent reference to get started: http://www.regular-expressions.info/reference.html

To create the rule click on "Add Rules…".

image

Select the "Blank Rule" template and click OK.

For the name, enter your domain name, or whatever makes the most sense to you.

Match URL section

In the Match URL Section, leave the defaults to match the pattern and Regular Expressions.  For the pattern, enter (.*) without the parentheses.  The "URL" is the part after the domain name.  i.e. www.ThisIsTheDomain.com/ThisIsTheURL.  It's the domain that we're interested in now, not the URL.

Conditions

The Conditions section is where we'll do most of the work.  Expand that section if it's collapsed and click "Add". 

The domain name is contained within the HTTP header called {HTTP_HOST}.  Here's where the fun comes.  The regular expression pattern that will match www.site2.com or site2.com (without the www) looks like this: ^(www.)?site2.com$. 

Here's what that means. 

  • The ^ is the character that signifies the start of the string.  That ensures that something.www.site2.com doesn't also get included with this rule.
  • The $ is the character that marks the end of the string.
  • ( ) parentheses are used to create section groups. 
  • ? means that something is optional.
  • Therefore, (www.)? means that with www. or without, either are accepted.

After filling in these fields you should have something like the following:

image

Now, here's the part that many people wouldn't guess at first.  Since URL Rewrite works on the URL only, while most code (ASP.NET, ASP, PHP, etc) works at the server level, they aren't aware of each other.  Just because you rewrite the URL doesn't mean that the code has any clue of the change.  As a result, any time that ASP.NET automatically creates the path, it will likely clash with the URL Rewrite rule.  For example, Response.Redirect("~/") will redirect to the root of the application.  That means that it can create a path like www.site2.com/site2.  Notice the extra site2 in the path.  The login page for ASP.NET will mess with you too.

A future blog post will cover how to hide the /site2 using URL Rewrite 2.0, but the easy solution is to ensure that www.site2.com and www.site2.com/site2 both go to the same place.  Both should be served from …\masterdomain.com\site2.  It means that the URL can be longer than you may prefer, but it allows the site to continue to function.

To achieve this, add an exclusion condition so that this rule doesn't redirect at all if the URL starts with /site2/.

There are 2 ways to achieve this.  You could go back to the URL section where we previously entered .* and update that section.  There isn't anything wrong with that at all.  For no particular reason that I can think of right now, I prefer to do this from the conditions section.  Here's how to do it:

Add another condition where the condition input is {PATH_INFO}, and set the dropdown to "Does Not Match the Pattern", and set the Pattern to ^/site2/.  That means that the PATH_INFO must start with /site2/.  Note that you shouldn't end with the $ this time because you want sub-sub folders to work too.  It should look like this:

image

Action Section

We're nearly done.  In the Action section, first set the "Action Type" to Rewrite.  Then set the Rewrite URL to \site2\{R:0} and ensure that the "Append query string" checkbox is checked.  The {R:0} is a back reference to the URL.  It will allow the URL to be carried through dynamically in the request.  The Append query string ensures that the query string itself will carry through.

The complete rule should look like this:

image

That's it.  Save and test.

Using a Text Editor

You may prefer to use a text editor or to see the config directly.  The rule generated for web.config looks like this:

<rewrite>
    <rules>
        <rule name="site2.com" stopProcessing="true">
            <match url=".*" />
            <conditions>
                <add input="{HTTP_HOST}" pattern="^(www.)?site2.com" />
                <add input="{PATH_INFO}" pattern="^/site2/" negate="true" />
            </conditions>
            <action type="Rewrite" url="\site2\{R:0}" />
        </rule>
    </rules>
</rewrite>

And, the rule for hawaiivisit.site2.com is similar.  It looks like this:

<rewrite>
    <rules>
        <rule name="hawaiivisit.site2.com" stopProcessing="true">
            <match url=".*" />
            <conditions>
                <add input="{HTTP_HOST}" pattern="^hawaiivisit.site2.com$" />
                <add input="{PATH_INFO}" pattern="^/hawaiivisit/" negate="true" />
            </conditions>
            <action type="Rewrite" url="\hawaiivisit\{R:0}" />
        </rule>
    </rules>
</rewrite>

The other things

I wanted to briefly mention what isn't covered in this blog post that you may want to consider. 

  • DNS. The 'how to' for your domain name purchase and directing isn't covered here.
  • Statistics. If you use  a client-side option like Google Analytics then this will work just as well under a single account.  However, if you are using a log based statistics program like SmarterStats then it's up to you to set rules in SmarterStats to filter out or sub-divide the statistics into useful sections i.e. 1 per site.
  • Email. You will likely need to setup another mail account with your host, or add the new domain as a domain alias to your existing account.
  • ASP.NET inheritance. web.config inherits down the entire path but the ASP.NET folders do not inherit past application boundaries.  More on that here.  One workaround if ASP.NET inheritance fights with you is to not have a site in the website root.  Instead, place all sites in their own subfolder.
  • You'll likely need to mark the folder as an application so that it is an ASP.NET application.  (assuming ASP.NET of course)