Wednesday, February 16, 2022

How to resolve Global Exception Logger with Dependency Injection in ASP.NET Web API?

Introduction

In this article, you will learn how to resolve Global Exception Logger with dependency injection in ASP.NET Web API using Autofac.

How to resolve Global Exception Logger with dependency injection

Step 1: Create the custom exception logger by inheriting the IExceptionLogger interface to write your custom logging logic.

/// 
/// The main class GlobalExceptionLogger.
/// Handles the exception logging requests.
/// 
public class GlobalExceptionLogger : IExceptionLogger
{
    /// 
    /// 
    /// 
    public ILogger Logger { get; set; }
    /// 
    /// Initializes a new instance of the  class.
    /// 
    public GlobalExceptionLogger()
    {
        Logger = NullLogger.Instance;
    }
    /// 
    /// Logs the exception.
    /// 
    /// The exception context.
    /// 
    /// 
    public async Task LogAsync(ExceptionLoggerContext context, CancellationToken cancellationToken)
    {
        var ex = context.Exception;
        string message = $"{ex.Message}--{ex.Source}\n{ex.StackTrace}\n{ex.TargetSite}\n";
        await Task.Run(() =>
        {
            Logger.Error(ex, message);
        });
    }

}

Step 2: Register your custom exception logger class in the Autofac container to resolve it through dependency injection.

/// 
/// The main class AutofacConfig.
/// Provides Autofac DI configuration of the API.
/// 
public static class AutofacConfig
{

    #region Autofac Container
    private static Lazy builder =
      new Lazy(() =>
      {
          var autofacbuilder = new ContainerBuilder();
          RegisterTypes(autofacbuilder);
          return autofacbuilder.Build();
      });

    /// 
    /// Configured Autofac Container.
    /// 
    public static IContainer Container => builder.Value;
    #endregion

    /// 
    /// Registers the type mappings with the autofac container builder.
    /// 
    /// The autofac container builder to configure.
    /// 
    /// 
    public static void RegisterTypes(ContainerBuilder builder)
    {
       string baseDirectoryPath = AppDomain.CurrentDomain.BaseDirectory + "bin";
        if (!Directory.Exists(baseDirectoryPath))
            baseDirectoryPath = AppDomain.CurrentDomain.BaseDirectory;

        builder.RegisterModule(new LoggingModule());
        builder.RegisterModule(new FileStoreModule());
        //builder.RegisterModule(new CloudJobManager.CloudJobManagerModule());
        builder.RegisterApiControllers(Assembly.GetExecutingAssembly()).InstancePerRequest();
        //builder.RegisterType().InstancePerLifetimeScope();

        var assemblies = Directory.EnumerateFiles(baseDirectoryPath, "*.dll", SearchOption.TopDirectoryOnly)
            .Where(filePath => Path.GetFileName(filePath).StartsWith("MyApp"))
            .Select(Assembly.LoadFrom).Where(assemblyType =>
            (assemblyType.FullName.StartsWith("MyApp") && !assemblyType.FullName.Contains("MyApp.Framework") &&
            !assemblyType.FullName.Contains("MyApp.Reporting.API")
            )).ToArray();

        builder.RegisterAssemblyTypes(assemblies)
        .AsImplementedInterfaces().InstancePerLifetimeScope();

        builder.RegisterType().AsSelf().AsImplementedInterfaces();
        builder.RegisterType().AsSelf().AsImplementedInterfaces();

        builder.RegisterType<ReportService>().As<IReportService>().InstancePerRequest();

    }
}

Step 3: Replace the custom exception logger in the HttpConfiguration services to use it in the place of the default ASP.NET exception logger.

public static class WebApiConfig
{
    public static void Register(HttpConfiguration config)
    {
        // Web API configuration and services
        config.DependencyResolver = new AutofacWebApiDependencyResolver(AutofacConfig.Container);

        // Web API configuration and services
        //config.Services.Replace(typeof(IExceptionLogger), new  GlobalExceptionLogger());
        //config.Services.Replace(typeof(IExceptionHandler), new GenericExceptionHandler());

        // Inject our exception logger and handler
        config.Services.Replace(typeof(IExceptionHandler), config.DependencyResolver.GetService(typeof(GenericExceptionHandler)));
        config.Services.Replace(typeof(IExceptionLogger), config.DependencyResolver.GetService(typeof(GlobalExceptionLogger)));

        // Web API routes
        config.MapHttpAttributeRoutes();

        config.Routes.MapHttpRoute(
            name: "DefaultApi",
            routeTemplate: "api/{controller}/{id}",
            defaults: new { id = RouteParameter.Optional }
        );
    }
}

Conclusion

Whenever an unhandled error occurs then you have a chance to log it. The information regarding the can be stored somewhere for review. There you can write the issue to a log or write custom logic.

Thursday, July 22, 2021

Azure DevOps Server - How to fix indexing isn't working issue?


Introduction

In this article, you will learn how to fix the Azure DevOps Server indexing issues.

How to fix indexing isn't working, or is in progress issue

In our scenario, the Search was not working and was completely broken. Nobody was able to search in the code and work items.

To fix this, we have referenced the Microsoft documentation - Manage Search indexing to create the search index again.

Below is the step to fix the search indexing:

  • Download the scripts from the Code-Search GitHub repository on the server.
  • Extract the zip somewhere and open the Powershell in Administrative mode.
  • Change the directory to your Azure DevOps Server version. I have to reindex the entire collection.
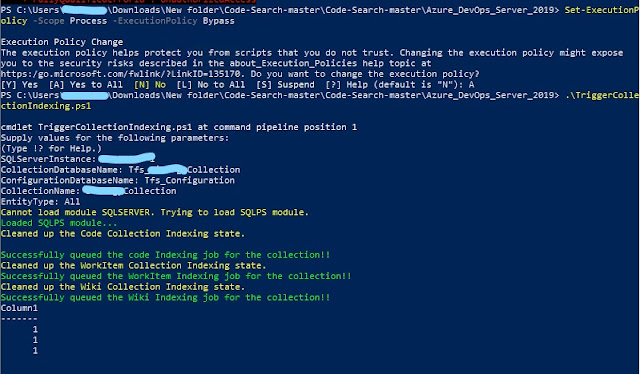
  • Now execute the script TriggerCollectionIndexing.ps1 to reindex the collection but first, you need to change the policy to execute the command

    Set-ExecutionPolicy -Scope Process -ExecutionPolicy Bypass
  • After that run the TriggerCollectionIndexing.ps1 file. You need to enter the SQL server instance name of the Azure DevOps Server, Collection database name, Configuration database name, and the entities to reindex.

Conclusion

Search indexing is an important feature in the Azure DevOps Server, use the scripts to get the status of the search indexing and fix the issues.

Tuesday, September 1, 2020

SQLite- Check If Table Exists

Introduction 

In this article, you will learn to check if a table exists in the SQLite database or not.

How to check if a table exists in the database 

You execute the below command to check whether a table exists or not in the SQLite database:
SELECT count(*) FROM sqlite_master WHERE type='table' AND name='tableName';
It will return value either 0 or greater than 0. If the table doesn’t exist then the result will be 0 otherwise 1. 

You can use this query in any programming language to the existence of the table in the database. For an example below .NET code block will check the existence of the table in the SQLite database:

string sqliteDBFile = string.Format("{0}\\{1}", "D:\\Logs", "Log.db");
string tableName = "LogTable";
string columnName = "CreatedOn";
if (!File.Exists(sqliteLogDBFile))
{
    using (SQLiteConnection con = new SQLiteConnection(string.Format("data source={0}", sqliteLogDBFile)))
    {
       if (CheckIfTableExists(con, Constants.SQLiteLogTableName))
       {
            if (!CheckIfColumnExists(con, tableName, columnName))
            {
                        
            }
        }
    }
}

private bool CheckIfTableExists(SQLiteConnection conn, string tableName)
{
    if (conn.State == System.Data.ConnectionState.Closed)
        conn.Open();

    using (SQLiteCommand cmd = new SQLiteCommand(conn))
    {
        cmd.CommandText = $"SELECT count(*) FROM sqlite_master WHERE type='table' AND name='{tableName}';";
        object result = cmd.ExecuteScalar();
        int resultCount = Convert.ToInt32(result);
        if (resultCount > 0)
            return true;

    }
    return false;
}

You can also check that that if a column exists in the table or not using the below line of code which using the table metadata and then check the column name for the match.

private bool CheckIfColumnExists(SQLiteConnection conn, string tableName, string columnName)
{
    if (conn.State == System.Data.ConnectionState.Closed)
        conn.Open();

    using (SQLiteCommand cmd = new SQLiteCommand(conn))
    {
        cmd.CommandText = string.Format("PRAGMA table_info({0})", tableName);

        var reader = cmd.ExecuteReader();
        int nameIndex = reader.GetOrdinal("Name");
        while (reader.Read())
        {
            if (reader.GetString(nameIndex).Equals(columnName))
            {
                return true;
            }
        }
    }
    return false;
}

Checking a table exists or not before creating a new table 

Checking a table before creating or dropping a table is the common use case. To run the query without failing it with a fail-safe check. In SQLite, you can sure that table should be created in the database if it does not exist using the below query:
CREATE TABLE IF NOT EXISTS <table_name>> (column1_name <datatype>,....)
Conclusion 

You have learned that how can check the existence of the database base objects in an SQLite database.

Sunday, June 7, 2020

NDepend - Dependency Graph Navigating Coupling Graph

Introduction

This is another post followed by NDepend - Improved Dependency Graph Feature. In this article, you will discover more about the Dependency Graph features e.g. focus on a node (double click a node in graph) or coupling graph (double click an edge in the graph)
Again, we going to use the same OrchardCore project used in the previous article on NDepend Dependency Graph. Open the project and then navigate to the Dependency Graph Zoom in a bit either using the mouse wheel or button in the toolbar.

Focusing on a node
Select a node in the graph and double click on it. Now you will see that node will be in the center of the diagram and it is in the view of focus. Now you can see the element and paths of the selected node.
Transitioning to coupling graph
Coupling is related to the dependency between the modules. You can see the Dependency Graph by double click an edge in the graph. It is a great feature to go through the different dependencies path for the module node, you selected.  

Here is the visualization of the navigation in the Dependency Graph 

Conclusion

NDepend Dependency Graph has a smooth transition between the different dependencies and it is good that it is navigating to the coupling graph just by clicking on the edges.

Saturday, May 23, 2020

NDepend - Improved Dependency Graph Feature

Introduction

This is another post related to the NDepend tool and Code Quality for .NET Core application follow by this

NDepend makes .NET code beautiful by measuring quality with metrics, generate diagrams, and enforce decisions with code rules, right in Visual Studio.
I have used this tool for analyzing the .NET Core project and it is a great and intuitive tool to work with. 

The new version NDepend  v2020.1.0 is available with the latest features e.g.  Dependency Graph Completely Rebuilt

What is new with the Dependency Graph

I have also used the Dependency Graph in the previous version of the NDepend. It was much useful to identify the dependency between the different assemblies in the solution.

This time the NDepend team improvise this feature and restructured to analyze large project architecture. Below features make it easy to analyze using the dependency graph.

New navigation system
you can drag and drop from Visual Studio solution explorer, Expand/Collapse parent elements, Search elements in graphs by name with the search windows, also provided Undo / Redo feature.

New layout options

  • Group-By Assemblies, Namespaces, Types, Clusters Filters to show or hide
  • Box size proportional to element size, Edge width proportional to the coupling strength
  • Color conventions instantly identify caller/callee elements
  • Complex graph simplified with Clusters
  • Export to SVG vector format or PNG bitmap format.


Let's explorer that how can we generate Dependency Graph by taking an example of the OrchardCore application which contains more than 143 projects. 

Open the application in the Visual Studio and create an NDepend project by attached to the Visual Studio solution.

Filter and select the project that you want to analyze.


Now a dialog box will open with options, View NDepend Dashboard, Show NDepend Interactive Dependency Graph. Click on the "Show NDepend Interactive Dependency Graph" button to see the dependency graph.


After a few seconds windows will open which is shown in the image below. It has the relationship between the projects and their dependencies.

You can also zoom in or out of the dependency graph to see a group of objects. See the below screenshot to know the zoom feature. you can move and see the project elements.
Conclusion
I genuinely think NDepend is very powerful and very easy to use for analyzing application architecture. The NDepend team and Patrick are very active and we can expect a lot of good improvements in future versions which help to create quality software.

Thursday, January 24, 2019

How to enable docker support ASP.NET applications in Visual Studio

Introduction

In this article, you will know that how to enable docker support for ASP.NET application in Visual Studio. We will create an ASP.NET Core application docker support and also enable docker support in an existing application.

Prerequisites

  • Docker for Windows
  • Visual Studio 2017 or later with the .NET Core cross-platform development workload

Enable Docker support in a new application

You can get Docker support in your project when you create a Visual Studio web project, either. NET Core or the full framework. If you choose the .NET Core framework, you get the option to add Docker support in the new project wizard but for the full framework, we can add Docker support later context menu “Solution Explorer”. See below steps to create a .NET Core project with Linux container support:

clip_image001

Docker tools in Visual Studio understand the difference between. NET Core and the. NET full framework so the generated files will nicely reflect those different targeted platforms.

To add Docker support for the full framework, go through previous post - Containerizing a .NET application

Enable Docker support in a new application

You add Docker support after creating a project is by right-clicking the project in the “Solution Explorer” and then select “Docker Support” option under the Add submenu.

clip_image003

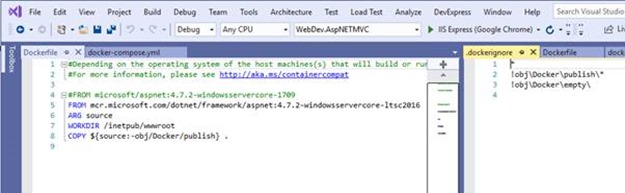
Visual Studio will add DockerFile and .dockerignore to the project that will be used to build a docker container image starts with a reference to the base image dotnet:2.2-aspnetcore-runtime.

clip_image005

Note: To build this container, you need to switch the Docker tools for Windows on your machine to run Linux containers. If it is targeting to different operating system type, then you would get errors during the build since you can't mix Linux containers with Windows containers.

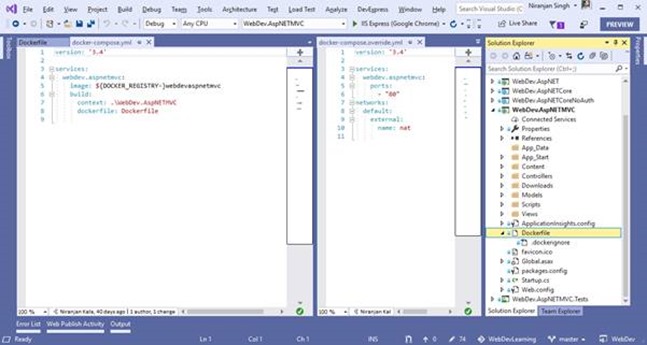
Docker support also added the generated YAML files. YAML files can be used together with docker-compose to execute Docker commands to a set of containers instead of only one at a time so that multiple container can work together for the microservices scenarios.

docker build -f "D:\DevWorkSpaces\GitHub\WebDevLearning\WebDev\WebDev.Containerized.MVCWeb\Dockerfile" -t webdevcontainerizedmvcweb:dev

clip_image007

Build Docker image from CLI

Open command prompt in administrative mode and run the below command  in project folder:

C:\Users\niranjansingh\Source\Repos\WebDevLearning\WebDev\WebDev.AspNETMVC>docker build .

clip_image001

Running application under Docker Environment

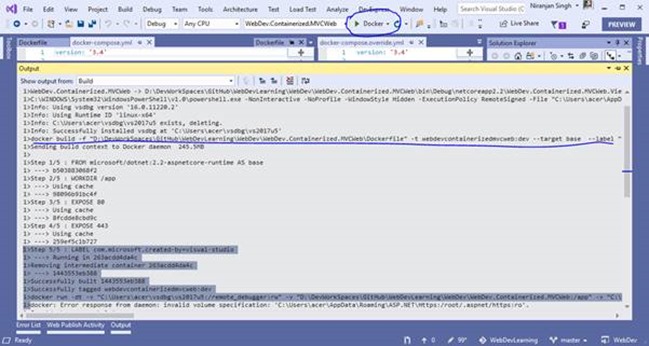
For .NET Core framework applications, Just run the application by selecting the Docker option just after the Run arrow button. After that application will build and create Docker image according to the settings provided in the DockerFile.

clip_image009

For my case application is targeting “Linux” and Docker for Windows on my system is configured to run the Windows contains so it will not build my case. So, remember to switch particular target Operating system containers before you build the application.

For a .NET framework application, make docker-compose as startup project. After this modify the .yml files to build and run the contains.

image

You will see Docker Compose button on the place of “Docker” in .NET full framework applications.

image

Click on Debug button to let the docker decompose to build and run the docker image on the bases of yml file configuration.

Wednesday, January 16, 2019

How to use Angular Lifecycle hooks

A component has a lifecycle which is managed by Angular. Below are the Angular component life cycle hooks:
  1. Create
  2. Render
  3. Create/Render child components
  4. Process Changes
  5. Destroy

Angular creates the component then renders it. After that it get the creates and renders its child components. If there are any changes in component’s data bound properties then processes changes and at last destroys it before removing its template from the DOM.
Angular provides a set of lifecycle hooks and below are few of them:
  1. OnInit – it is used to perform component initialization and it is used to perform any component initialization after Angular has initialized the data bound properties. It is a good place to retrieve the data for the template from a back-end service.
  2. OnChanges - It is used to perform any action after Angular sets data bound input properties.
  3. OnDestroy – This lifecycle hook to perform any clean-up before Angular destroys the component.

Using Angular Lifecycle Hooks

To use a lifecycle hook, you have to follow the below steps:

Implement the lifecycle hook interface

Angular provides several interfaces you can implement, including one interface for each lifecycle hook. For example, the interface for the OnInit lifecycle hook is OnInit.
export ProductListComponent implements OnInit {

Import Lifecycle hook from Angular packages

You have to import the lifecycle hook interface. Include OnInit in the import statement with Component as below
import { Component, OnInit } from '@angular/core';

Implement lifecycle hook method

After that you have to implement lifecycle hook method. Lifecycle hook interface defines one method which has name prefixed with ng with interface name. For example, the OnInit interface hook method is named ngOnInit.
ngOnInit() { // Some code here } 
Complete component declaration:
import { Component, OnInit } from '@angular/core';

@Component({
  selector: 'pm-products',
  templateUrl: './product-list.component.html',
  styleUrls:['./product-list.component.css']
})
export class ProductListComponent implements
{
       constructor() { }
      ngOnInit() { }
}
In this you can use another Angular Lifecycle hooks to implement required functionality at particular event.