Wednesday, May 22, 2024

Real-Time Speech Translation with Azure: A Quick Guide

Introduction

The Azure Speech Translation service enables real-time, multi-language speech-to-speech and speech-to-text translation of audio streams. In this article, you will learn how to run an application to translate speech from one language to text in another language using Azure’s powerful tools.

Objective

By the end of this article, you will be able to create and deploy an application that translates speech from one language to text in another language.

Step 1: Creating a New Azure Cognitive Services Resource Using Azure Portal

Task 1: Create Azure Cognitive Speech Service Resource

  1. Open a tab in your browser and go to the Speech Services page. If prompted, sign in with your Azure credentials.

  2. On the Create page, provide the following information and click on Review + create:

    • Subscription: Select your subscription (this will be selected by default).
    • Resource group: Create a new group named azcogntv-rg1. Click on OK.
    • Region: East US
    • Name: CognitiveSpeechServicesResource
    • Pricing tier: Free F0

    Create Speech Service

    Create Speech Service

  3. Once the validation passes, click on Create.

    Validation Passed

  4. Wait for the deployment to complete, then click on Go to resource.

    Deployment Complete

  5. Click on Keys and Endpoint from the left navigation menu. Copy and save Key 1 and Endpoint values in a notepad for later use.

    Keys and Endpoint

Task 2: Create Azure Cognitive Language Service Resource

  1. Open a new browser tab and go to the Language Services page. Sign in with your Azure credentials.

  2. Without selecting any option on the page, click on Continue to create your resource.

    Continue to Create Resource

  3. Update with the following details and then click on Review + Create:

    • Subscription: Your Azure subscription
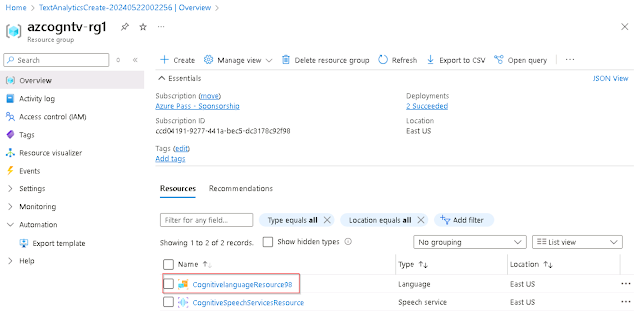
    • Resource Group: Select azcogntv-rg1
    • Region: East US
    • Name: CognitivelanguageResourceXX (Replace XX with any random number)
    • Pricing tier: Free (F0)
    • Select checkbox: By checking this box, I certify that I have reviewed and acknowledged the Responsible AI Notice terms.

    Create Language Service Create Language Service

  4. Review the resource details and then click on Create.

    Review and Create

  5. Wait for the deployment to complete, and once successful, click on Go to resource group.

    Deployment Successful

  6. Click on CognitiveLanguageResource.

    Cognitive Language Resource

  7. Click on Keys and Endpoints > Show keys. Copy Key 1 and endpoint values and save them in a notepad for later use.

    Keys and Endpoints

Step 2: Recognizing and Translating Speech to Text

Task 1: Set Environment Variables

Your application must be authenticated to access Cognitive Services resources. Use environment variables to store your credentials securely.

  1. Open Command Prompt and run mkdir Speech-to-Text to create a directory. Then run cd Speech-to-Text to navigate into it.

    mkdir Speech-to-Text
    cd Speech-to-Text
    
  2. To set the SPEECH_KEY environment variable, replace your-key with one of the keys for your resource saved earlier.

    setx SPEECH_KEY your-key
    setx SPEECH_REGION eastus
    

    Set Environment Variables

  3. After adding the environment variables, restart any running programs that need to read the environment variable, including the console window. Close the Command Prompt and open it again.

Task 2: Translate Speech from a Microphone

  1. Open Command Prompt, navigate to your directory (cd Speech-to-Text), and create a console application with the .NET CLI.

    dotnet new console
    

    Create Console App

  2. Install the Speech SDK in your new project with the .NET CLI.

    dotnet add package Microsoft.CognitiveServices.Speech
    

    Install Speech SDK

  3. Open the Program.cs file in Notepad from the Speech-to-Text project folder. Replace the contents of Program.cs with the following code:

    using System;
    using System.IO;
    using System.Threading.Tasks;
    using Microsoft.CognitiveServices.Speech;
    using Microsoft.CognitiveServices.Speech.Audio;
    using Microsoft.CognitiveServices.Speech.Translation;
    
    class Program
    {
        // This example requires environment variables named "SPEECH_KEY" and "SPEECH_REGION"
        static string speechKey = Environment.GetEnvironmentVariable("SPEECH_KEY");
        static string speechRegion = Environment.GetEnvironmentVariable("SPEECH_REGION");
    
        static void OutputSpeechRecognitionResult(TranslationRecognitionResult translationRecognitionResult)
        {
            switch (translationRecognitionResult.Reason)
            {
                case ResultReason.TranslatedSpeech:
                    Console.WriteLine($"RECOGNIZED: Text={translationRecognitionResult.Text}");
                    foreach (var element in translationRecognitionResult.Translations)
                    {
                        Console.WriteLine($"TRANSLATED into '{element.Key}': {element.Value}");
                    }
                    break;
                case ResultReason.NoMatch:
                    Console.WriteLine($"NOMATCH: Speech could not be recognized.");
                    break;
                case ResultReason.Canceled:
                    var cancellation = CancellationDetails.FromResult(translationRecognitionResult);
                    Console.WriteLine($"CANCELED: Reason={cancellation.Reason}");
    
                    if (cancellation.Reason == CancellationReason.Error)
                    {
                        Console.WriteLine($"CANCELED: ErrorCode={cancellation.ErrorCode}");
                        Console.WriteLine($"CANCELED: ErrorDetails={cancellation.ErrorDetails}");
                        Console.WriteLine($"CANCELED: Did you set the speech resource key and region values?");
                    }
                    break;
            }
        }
    
        async static Task Main(string[] args)
        {
            var speechTranslationConfig = SpeechTranslationConfig.FromSubscription(speechKey, speechRegion);
            speechTranslationConfig.SpeechRecognitionLanguage = "en-US";
            speechTranslationConfig.AddTargetLanguage("it");
    
            using var audioConfig = AudioConfig.FromDefaultMicrophoneInput();
            using var translationRecognizer = new TranslationRecognizer(speechTranslationConfig, audioConfig);
    
            Console.WriteLine("Speak into your microphone.");
            var translationRecognitionResult = await translationRecognizer.RecognizeOnceAsync();
            OutputSpeechRecognitionResult(translationRecognitionResult);
        }
    }
    
  4. Run your new console application to start speech recognition from a microphone:

    dotnet run
    
  5. Speak into your microphone when prompted. What you speak should be output as translated text in the target language:

    Speak this: The Speech service provides speech-to-text and text-to-speech capabilities with an Azure Speech resource and then press Enter.
    

    Speak Into Microphone

Conclusion

In this article, you translated speech from a microphone to a different language by updating the code in the Program.cs file. This powerful feature of Azure Cognitive Services allows for seamless and real-time translation, making it a valuable tool for various applications and industries.

Source Code

Friday, May 17, 2024

Quick Start: Create and Deploy C# Functions in Azure Using CLI

Introduction

This blog post will guide you through creating and deploying a C# function to Azure using command-line tools. This article will walk you through creating an HTTP-triggered function that runs on .NET 8 in an isolated worker process. By the end of this post, you will have a functional Azure Function that responds to HTTP requests.

Objective

In this article, you will:

  1. Install the Azure Functions Core Tools.
  2. Create a C# function that responds to HTTP requests.
  3. Test the function locally.
  4. Deploy the function to Azure.
  5. Access the function in Azure.

Prerequisites

Ensure you have the following installed:

  • Azure CLI (version 2.4 or later)
  • .NET SDK (version 6.0 and 8.0)
  • Azure Functions Core Tools (version 4.x)

Step 0: Install Azure Functions Core Tools

  1. Uninstall previous versions (if any):
    • Open the Settings from the Start menu.
    • Select Apps.
    • Click on Installed apps.
    • Find Azure Function Core Tools, click the three dots next to it, and select Uninstall.
  2. Install the latest version:
    • Navigate to the Azure Function Core Tools downloads page: Install the Azure Functions Core Tools.
    • Download the appropriate version of Azure Functions Core Tools for your operating system. (Recommended. Visual Studio Code debugging requires 64-bit.) 
    • Follow the prompts: Click Next, accept the agreement, and click Install.

    • Click Finish once the installation is complete.

Step 1: Prerequisite Check

  1. Open Command Prompt and execute the following commands to verify your setup:
    • func --version – This is to check that the Azure Functions Core Tools are version 4.x.
    • dotnet --list-sdks – This checks that the required versions are installed. It should be 6.0 and 8.0
    • az --version to check that the Azure CLI version is 2.4 or later.

  2. az login to sign in to Azure and verify an active subscription. Select your login in the browser that opens up. Log in to Azure when prompted:
    • A browser window will open. You can just select your Azure account to sign in.
    • The command prompt will display your Azure login details.


Step 2: Create a Local Function Project

  1. Initialize the function project: Run the func init command, as follows, to create a functions project in a folder named LocalFunctionProj with the specified runtime:

    func init LocalFunctionProj --worker-runtime dotnet-isolated --target-framework net8.0
    cd LocalFunctionProj
    

    This folder contains various files for the project, including configuration files named local.settings.json and host.json. Because local.settings.json can contain secrets downloaded from Azure, the .gitignore file excludes it from source control by default.

  2. Add a new HTTP-triggered function:

    func new --name HttpExample --template "HTTP trigger" --authlevel "anonymous"
    

  3. Examine the generated code:
     using Microsoft.Azure.Functions.Worker;
     using Microsoft.Extensions.Logging;
     using Microsoft.AspNetCore.Http;
     using Microsoft.AspNetCore.Mvc;
        
     namespace LocalFunctionProj
     {
         public class HttpExample
         {
             private readonly ILogger<HttpExample> _logger;
        
             public HttpExample(ILogger<HttpExample> logger)
             {
                 _logger = logger;
             }
        
             [Function("HttpExample")]
             public IActionResult Run([HttpTrigger(AuthorizationLevel.Anonymous, "get", "post")] HttpRequest req)
             {
                 _logger.LogInformation("C# HTTP trigger function processed a request.");
                 return new OkObjectResult("Welcome to Azure Functions!");
             }
         }
     }
    

Step 3: Run the Function Locally

  1. Start the local Azure Functions runtime host: Run your function by starting the local Azure Functions runtime host from the LocalFunctionProj folder:
    func start
    

    The output says that the worker process started and initialized. The function’s URL is also displayed.

  2. Test the function:
    • Copy the URL from the output and paste it into a browser.
    • You should see a message: “Welcome to Azure Functions!”

  3. Stop the function host:
    • Press Ctrl+C and confirm with y.

Step 4: Create Supporting Azure Resources

Before you can deploy your function code to Azure, you need to create three resources:

  • A resource group, which is a logical container for related resources.
  • A Storage account, which is used to maintain state and other information about your functions.
  • A function app, which provides the environment for executing your function code. A function app maps to your local function project and lets you group functions as a logical unit for easier management, deployment, and sharing of resources.
You can use the following commands to create these items. Both Azure CLI and PowerShell are supported.

  1. Sign in to Azure:

    If you haven’t done so, sign in to Azure: The az login command signs you into your Azure account.

     az login
    
  2. Create a resource group:

    Create a resource group named RGForFunctionApp in your chosen region:

    az group create --name RGForFunctionApp --location eastus
    

    The az group create command creates a resource group and populates the command shell with the created RG details with the Provisioning state - Succeeded

  3. Create a storage account:

    Create a general-purpose storage account in your resource group and region.

    az storage account create --name storaccforazfunc07 --location eastus --resource-group RGForFunctionApp --sku Standard_LRS --allow-blob-public-access false
    

    The az storage account create command creates a storage account named storaccforazfunc07 in the EastUS region. The details are populated in the command prompt, and the provisioning state is succeeded.


  4. Create the function app:

    Create the function app in Azure: Execute the below command:

    az functionapp create --resource-group RGForFunctionApp --consumption-plan-location eastus --runtime dotnet-isolated --functions-version 4 --name appforfunc07 --storage-account storaccforazfunc07
    

    The az functionapp create command creates the function app in Azure.

    • storaccforazfunc07 is the storage account that we created in the previous step.

    • appforfunc07 is the name of the app that we create here. It needs to be globally unique.

Step 5: Deploy the Function Project to Azure

After successfully creating your function app in Azure, you’re ready to deploy your local functions project using the func azure functionapp publish command.

  1. Deploy the function:
    func azure functionapp publish appforfunc07
    

    After deployment, a URL will be provided. This is the Invoke URL for your function.

Step 6: Invoke the Function on Azure

  1. Invoke the function using a browser:
    • Copy the Invoke URL and paste it into a browser.
    • You should see the same “Welcome to Azure Functions!” message.

  2. View real-time logs:

    Call the remote function again in a separate terminal window or in the browser. The terminal shows a verbose log of the function’s execution in Azure.

    func azure functionapp logstream appforfunc07
    
    • Open another terminal or browser window and call the function URL again to see the real-time logs.
    • Press Ctrl+C to end the logstream session.

Step 7: Clean Up Resources

  1. Delete the resource group:

    Execute the following command to delete the resource group and all its contained resources. Confirm if you want to perform this operation and hit Enter.

    az group delete --name RGForFunctionApp
    

Conclusion

Congratulations! Using command-line tools, you’ve successfully created, tested, and deployed a C# function to Azure. This step-by-step guide has walked you through installing necessary tools, setting up a local development environment, creating and running a function locally, deploying it to Azure, and finally cleaning up the resources. Azure Functions provides a robust, serverless compute environment to build and quickly deploy scalable, event-driven applications. Happy coding!

Thursday, May 9, 2024

Unleashing the Power of Azure AI: A Comprehensive Guide to Text-to-Speech Applications

 Introduction:

In the dynamic landscape of application development, efficiency and cost-effectiveness are paramount. For developers working on projects that involve video narration, traditional methods of hiring vocal talent and managing studio resources can be both cumbersome and expensive. Enter Microsoft’s Azure AI services, offering a suite of APIs that empower developers to integrate cutting-edge text-to-speech capabilities into their applications. In this comprehensive guide, we’ll delve into the intricacies of Azure AI, providing step-by-step instructions and code snippets to help you harness its full potential for creating text-to-speech applications.

Objective:

  • Establish an Azure AI services account
  • Develop a command-line application for text-to-speech conversion using plain text
  • Provide detailed insights and code snippets for each stage of the process

Creating a Text-to-Speech Application using a Text File

Step 1: Creating an Azure AI Services Account

  1. Begin by navigating to the Azure portal and signing in with your credentials.
  2. Once logged in, locate the Azure AI services section and proceed to create a new account.

  3. In the Create Azure AI window, under the Basics tab, enter the following details and click on the Review+create button.

  4. In the Review+submit tab, once the Validation is Passed, click on the Create button.

  5. Wait for the deployment to complete. The deployment will take around 2-3 minutes.
  6. After the deployment is completed, click on the Go to resource button.

  7. In your AzureAI-text-speechXX window, navigate to the Resource Management section and click on Keys and Endpoints.

  8. Configure the account settings according to your requirements.In the Keys and Endpoints page, copy KEY1, Region, and Endpoint values and paste them into a notepad as shown in the below image, then Save the notepad for later use.

Step 2: Create your text to speech application

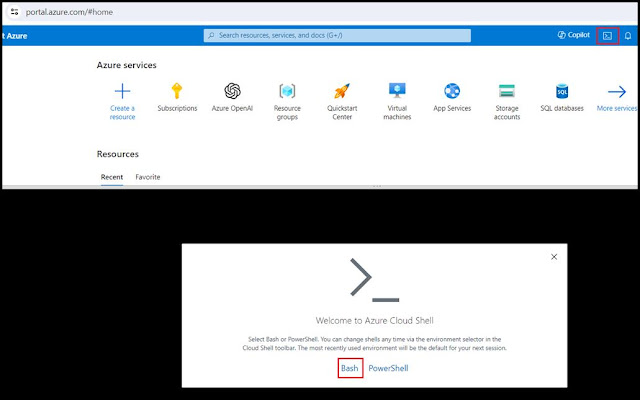
  1. In the Azure portal, click on the [>_] (Cloud Shell) button at the top of the page to the right of the search box. A Cloud Shell pane will open at the bottom of the portal. The first time you open the Cloud Shell, you may be prompted to choose the type of shell you want to use (Bash or PowerShell). Select Bash. If you don’t see this option, then you can go ahead and skip this step.

    6wavjic5.jpg

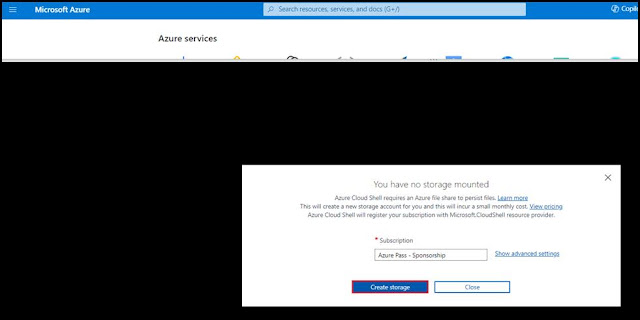
  2. In You have no storage mounted dialog box, click on the Create storage.

    i8pikt8d.jpg

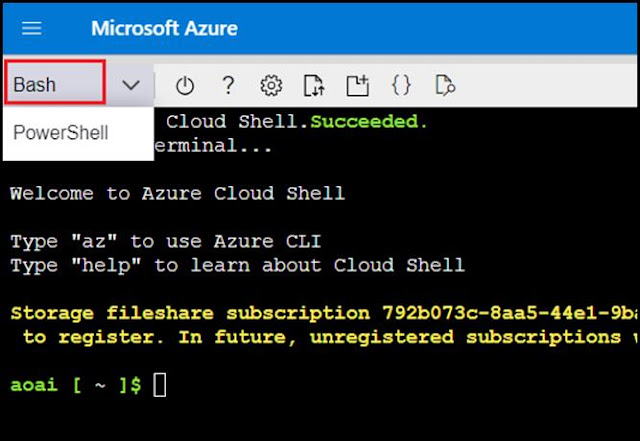
  3. Ensure the type of shell indicated on the top left of the Cloud Shell pane is switched to Bash. If it’s PowerShell, switch to Bash by using the drop-down menu.

    qbb1qkgf.jpg

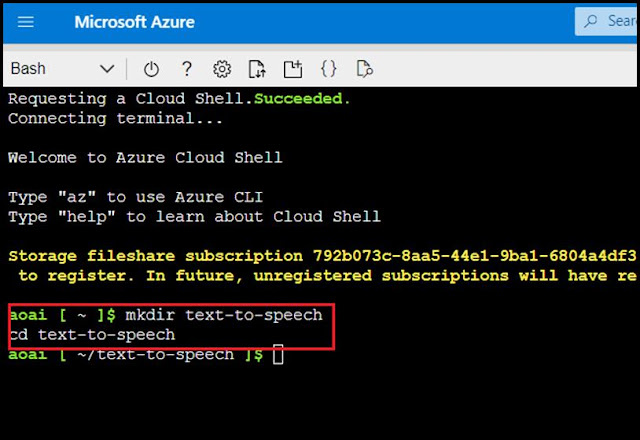
  4. In the Cloud Shell on the right, create a directory for your application, then switch folders to your new folder. Enter the following command

    mkdir text-to-speech
    cd text-to-speech
    

    s1xdm90b.jpg

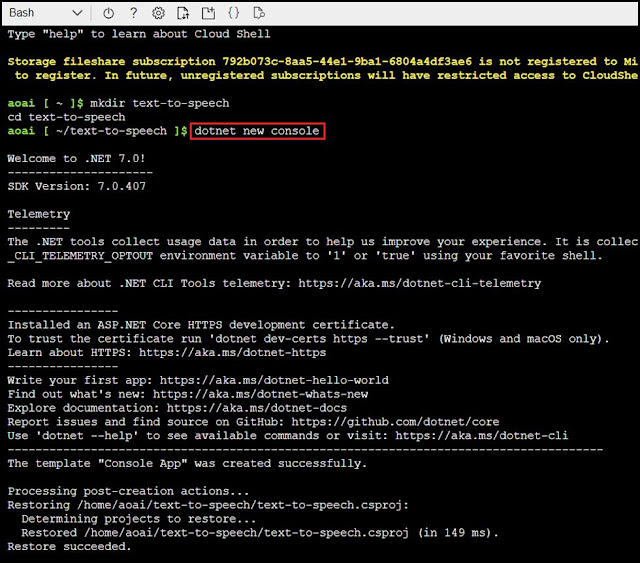
  5. Enter the following command to create a new .NET Core application. This command should take a few seconds to complete.

    dotnet new console

    lfvq8jtr.jpg

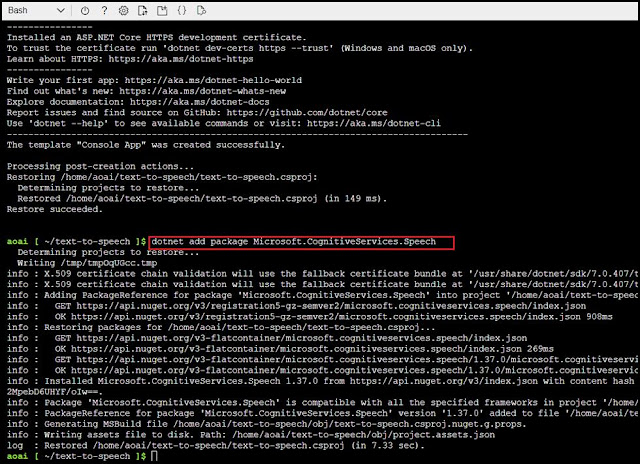
  6. When your .NET Core application has been created, add the Speech SDK package to your application. This command should take a few seconds to complete.

    dotnet add package Microsoft.CognitiveServices.Speech

    0wp2tdec.jpg

Step 3:Add the code for your text to speech application

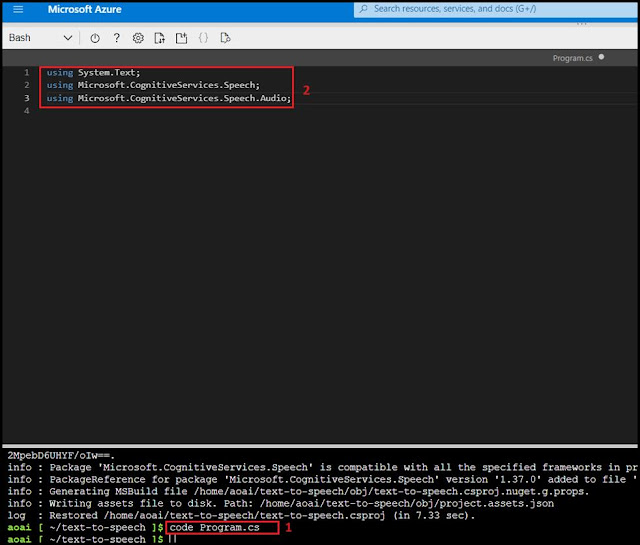
  1. In the Cloud Shell on the right, open the Program.cs file using the following command.

        code Program.cs
    
  2. Replace the existing code with the following using statements, which enable the Azure AI Speech APIs for your application:

    using System.Text;
    using Microsoft.CognitiveServices.Speech;
    using Microsoft.CognitiveServices.Speech.Audio;
    

    uo6fzs9i.jpg

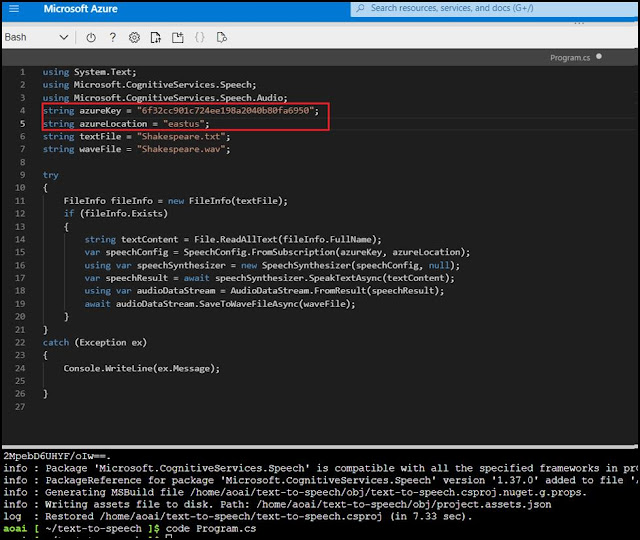
  3. Below the using statements, add the following code, which uses Azure AI Speech APIs to convert the contents of the text file you’ll create into a WAV file with the synthesized voice. Replace the azureKey and azureLocation values with the ones you copied in the last task 1.

    string azureKey = "ENTER YOUR KEY FROM THE FIRST EXERCISE";
    string azureLocation = "ENTER YOUR LOCATION FROM THE FIRST EXERCISE";
    string textFile = "Shakespeare.txt";
    string waveFile = "Shakespeare.wav";
        
    try
    {
        FileInfo fileInfo = new FileInfo(textFile);
        if (fileInfo.Exists)
        {
            string textContent = File.ReadAllText(fileInfo.FullName);
            var speechConfig = SpeechConfig.FromSubscription(azureKey, azureLocation);
            using var speechSynthesizer = new SpeechSynthesizer(speechConfig, null);
            var speechResult = await speechSynthesizer.SpeakTextAsync(textContent);
            using var audioDataStream = AudioDataStream.FromResult(speechResult);
            await audioDataStream.SaveToWaveFileAsync(waveFile);       
        }
    }
    catch (Exception ex)
    {
        Console.WriteLine(ex.Message);
        
    }
    

    nq1qs7oa.jpg

  4. This code uses your key and location to initialize a connection to Azure AI services, then reads the contents of the text file you\‘ll create, then uses the SpeakTextAsync() method of the speech synthesizer to convert the text to audio, then uses an audio stream to save the results to an audio file.
  5. To save your changes, press Ctrl+S to save the file, and then press Ctrl+Q to exit the editor

Step 4: Create a text file for your application to read

  1. In the Cloud Shell on the right, create a new text file that your application will read:

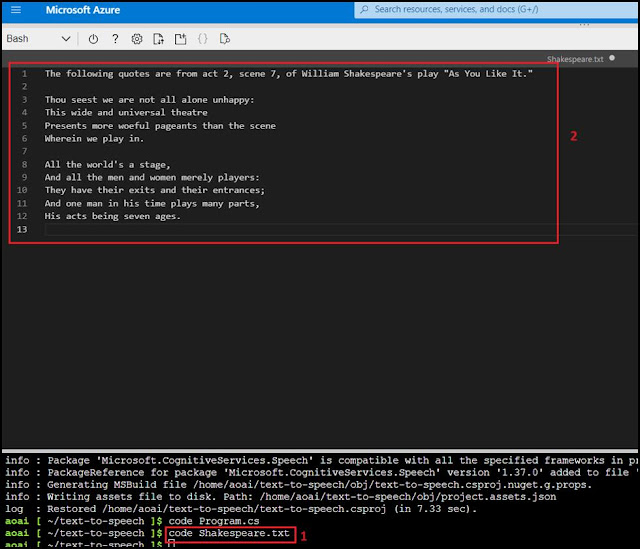
    code Shakespeare.txt

  2. When the code editor appears, enter the following text.

    The following quotes are from act 2, scene 7, of William Shakespeare's play "As You Like It."
        
    Thou seest we are not all alone unhappy:
    This wide and universal theatre
    Presents more woeful pageants than the scene
    Wherein we play in.
        
    All the world's a stage,
    And all the men and women merely players:
    They have their exits and their entrances;
    And one man in his time plays many parts,
    His acts being seven ages.
    

    dbjulb6c.jpg

  3. To save your changes, press Ctrl+S to save the file, and then press Ctrl+Q to exit the editor

Step 5:Run your application

  1. To run your application, use the following command in the Cloud Shell on the right:

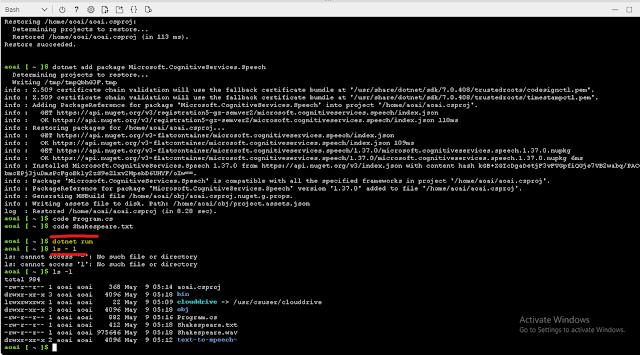
    dotnet run

  2. If you don’t see any errors, your application has run successfully. To verify, you can just run the following command to get a list of files in the directory.

    ls -l

  3. You should get a response like the following example, and you should have the Shakespeare.wav file in the list of files

    ru8br6zg.jpg

Step 6: Listen to WAV file

To listen to the WAV file that your application created, you’ll first need to download it. To do so, you can just use the following steps.

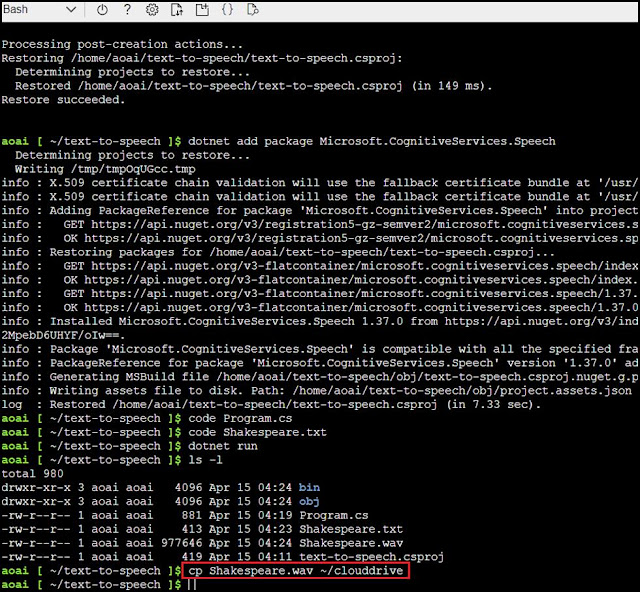
  1. In the Cloud Shell on the right, use the following command to copy the WAV file to your temporary cloud drive:

    cp Shakespeare.wav ~/clouddrive

    dputtw5l.jpg

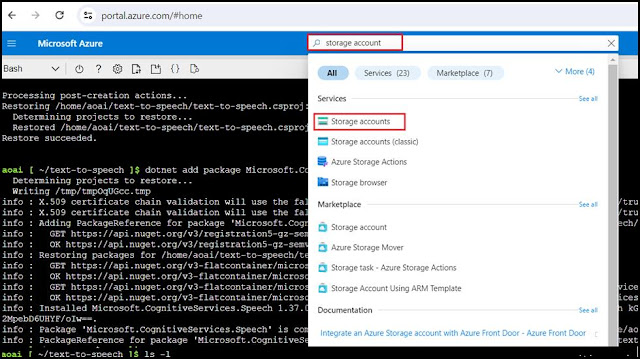
  2. In the Azure portal search box, type Storage account, then click on Storage account under Services.

    shyvtngw.jpg

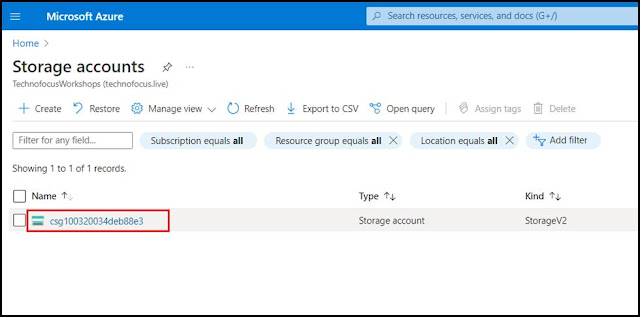
  3. In the Storage accounts page, navigate and click on cloud storage account .

    eq320wdc.jpg

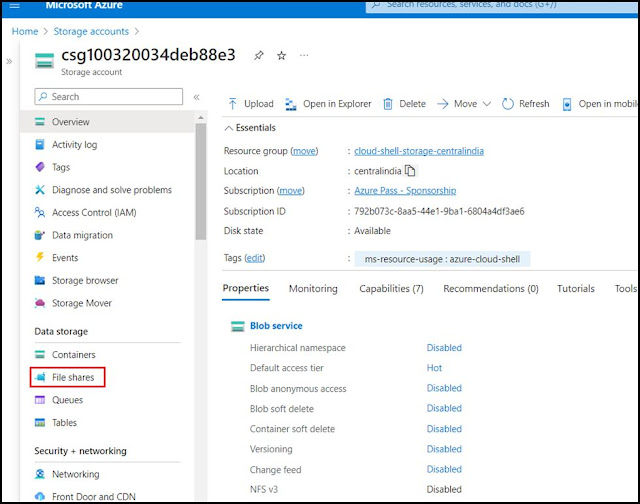
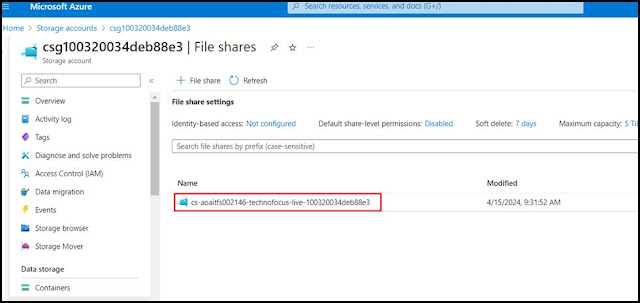
  4. In the Storage account page left-sided navigation menu, navigate to the Data storage section, then click on the File shares.

    p1b7cwn3.jpg

  5. Then select your cloudshellfilesXXX file share.

    xzj0kvaf.jpg

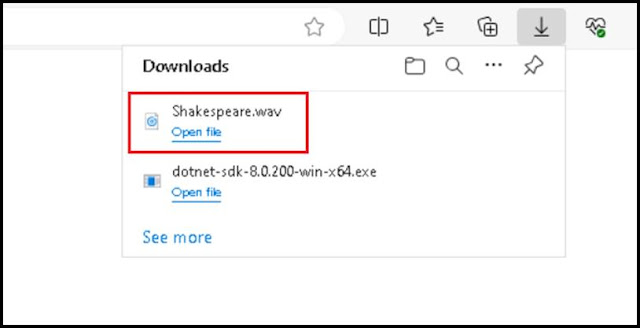
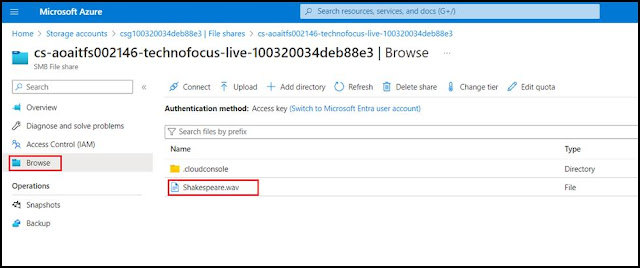
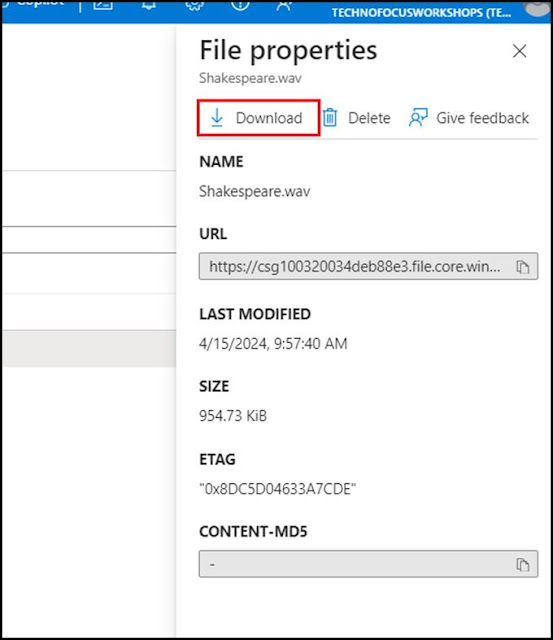
  6. When your cloudshellfilesXXX file shares page is displayed, select Browse, then select the Shakespeare.wav file, then select the Download icon.

    0yl4iwyw.jpg

    7godv6yk.jpg

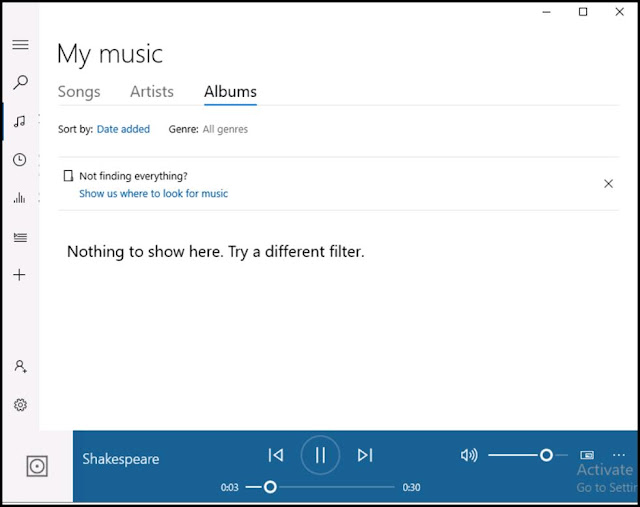
  7. Download the Shakespeare.wav file to your computer, where you can listen to it with your operating system’s audio player.

    b1e0awv0.jpg

    w2pcp960.jpg

Conclusion:
Following the comprehensive instructions and the provided code snippets, you can seamlessly leverage Azure AI services to integrate text-to-speech capabilities into your applications. Azure AI empowers developers to enhance user experiences and streamline workflow processes. Embrace the power of Azure AI and unlock new possibilities for your projects.