Throughout my carrier I have worked on various projects in different environment. Few of them are completed solo and few are with small or big teams. As per my opinion and learning till now “Writing a good and clean code is an art”. This is improved with experience and learning about the “Design Patterns”.
When you are doing project as one man army then you are good to write better code and refactor it maximum as per your understanding and knowledge, but when it done with in a large project and team then a project manager or Architect will definitely worry about the quality and success of the project.
In starting days of my carrier, One day my manager asked me to learn about the Cohesion and Coupling. I was not able to understand it much at that time and tried so many time to implement it in my coding practices. After continuously taking care of such factors and knowing about the “Design Patterns” e.g. SOLID, FAÇADE etc. what I have realized that all of these things redirect the programmers to make “Quality Code”.
After this when it comes to manage a big project then you require some tools which help to find issues in a large project. It makes an architect to keep free from these below question for some instance:
- Is the code looking good?
- What about its complexity and test coverage?
- Can you consider the code as maintainable with a good scalability?
- Are there instances of copy and paste code smells?
- How loosely and tightly coupled is the architecture? (In terms of cohesion and coupling etc.)
Doing this task manually is a time consuming process because checking and running every module will definitely consume some time. Without running the project it is possible in manually compiling and inspecting but with the tools it is much time saving process.
To check the quality of the code and analyze, I put my hands on Visual Studio inbuilt tools e.g. Unit Test Runner, Code Metrics, and Static Code Analyzes. These tools are good to work but there are few third party tools available to do some task with high precision analyzes e.g. FxCop, JustCode, ReSharper, and NDepend.
In this article, I am going to explorer the features and benefits of NDepend.
What is NDepend and its use??
NDepend is a static code analyzes for .NET. NDepend can be used in both standalone and Visual Studio integrated mode (Through Visual Studio extension). This nice tool is create by Patrick Smacchia for the developer community.
NDepend Visual Studio extension performs a range of analyzes across a solution, either during design time or retrospectively across an existing project. Current version of NDepend 6 provides 82 Code Metrics which are analyzed and reported on by the tool either in GUI or html format.
Right now I have used it in Visual Studio Integration mode. I prefer to use in integrated environment rather than doing application switch for doing same thing in different window and NDepend provide most of its functionality in Visual Studio while working with the project through a separate menu.

Setting NDepend Integration with Visual Studio:
To enable work NDepend in Visual Studio, NDepend guys provides an extension installer “NDepend.VisualStudioExtension.Installer.exe”. Check highlighted file in the below image.
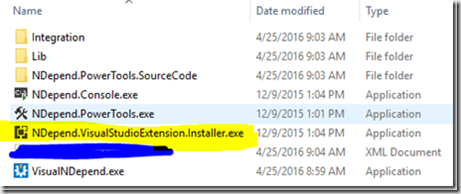
Once you run this extension installer it will pop up an installation dialog which let us to integrate NDepend in our desired version of Visual Studio. Right now I am using Visual Studio 2015, so I installed for my IDE.
![clip_image003[6]](https://blogger.googleusercontent.com/img/b/R29vZ2xl/AVvXsEjlZRHkKeMZbnvxEbQmH6PlyShrTOGjNJH_lZgXWx_PZvLZp7YeGBK8jZyJnVfFxr17Zg0RrY-eXiLXTu_3-UBNd9pF2LuACAE3YlOnswd5KqbEzRuJWu0T_tKZWU3_33QYJH11Lr1dkC5h/?imgmax=800 "clip_image003[6]")
After completing installation, you can access to various metrics, rules, graph, reports, analyzer results and tools at one place to analyze the project for different aspect of the quality measures.
NDepend is mainly a static analyzes tool and more. It provide out of the box rule and customizability of rule through CQLinq, Visual Dependency representation, Build Integration and Change tracking. NDepend allow us to write own custom rules and you can visualize your code base and its dependencies with series of matrices and graphs as well.
It does more than providing snapshot of the code base at moment some times. It integrates in to Build process and allows us to monitor the evolution of the code and decide whether you making progress towards quality or not.
Start analyzing my first project with NDepend
After installing NDepend in Visual Studio, I found it very user friendly and quite intuitive. You can just select project from the NDepend menu to start analyzing it. Let see how its start screen looks like in first glance.
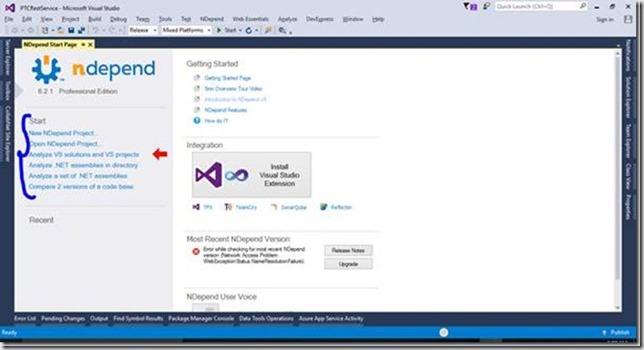
Here you can select specific menu to start working with NDepend. Now my solution is open so I am just going attach a new NDepend project to current solution. Just click on the circle in status bar of the Visual Studio and you have access to NDepend here also. See below image.
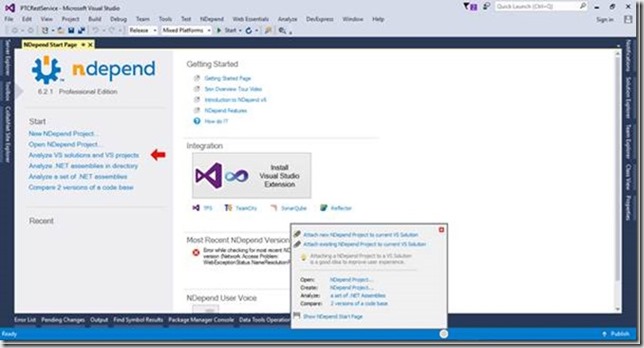
Now select “Attach new NDepend project to current VS Solution”. Now it prompt to select the assembly to analyze and you can also add another assemblies on below screen.
![clip_image006[6]](https://blogger.googleusercontent.com/img/b/R29vZ2xl/AVvXsEhVpaqTPAdeWaQR7m30EfQXFYtyqZsUNpUqoNgjKTK6bsDqfsiUXJS03pp7bkwg4oTQ6yGBS6LI3mC3cPvQKWoqtW0gm63kwlH6Hjm18VxJ8Ag9gj5NOwUchxCpZIP6G_otbkT71rixVl9X/?imgmax=800 "clip_image006[6]")
Just click on “Analyze a single .NET Assembly”. Now it start analyzing the assembly and after completion of process it will pop up a dialog and along this generates html report about the analyze results.

I am going to click on the View NDepend Dashboard and it redirected me to dashboard.
![clip_image008[6]](https://blogger.googleusercontent.com/img/b/R29vZ2xl/AVvXsEisOB7kPPGnyh8AqdFyjW17kUeIhvv-JmdvijNL7HrVgXeWnx4uHKkqRBem0n0QZ0IoM01HsZT6GWoBkQ7HXt7f5qJ7yHqAaJDv6dgSpjNk3dYEIa1ysANMxnc6ec9zJXDbQYhuUeR3hO7c/?imgmax=800 "clip_image008[6]")
And html generated report is shown as below:

In Visual Studio, there are lots of windows available through NDepend to analyze quality of the code base and even you can customize these. I am going through main features of the NDepend one by one. See below screen shot with Queries and Rules Explorer, Dependency Graph and Queries editor.
![clip_image010[6]](https://blogger.googleusercontent.com/img/b/R29vZ2xl/AVvXsEjhtSS7k_cgQUI7VU_M-UbpuJ_Z_AHlT03JBFAV-IDNG6Pg2dq1q_dUsLyQdbpyJN8eRDER7J-EGNiZ6ALnmTI249Y-Mt6fEW_M9V5FCp9gkU4GDiwunbArVoIYCums5uvfqM-8zo89sc3K/?imgmax=800 "clip_image010[6]")
Code Rule and Code Query over LINQ (CQLinq)
NDepend project provides build-in metrics when you create a new project to analyze an assembly. As I saw in Queries and Rules Explorer, there are more than 200 default project rules and their queries.
These rules are made up using the CQLinq. CQLinq is default scripting for NDepend to create rule queries. So in this way you can create our own queries and customize them too. CQLinq editor provides code completion and intellisense with live error description.

Dependency Matrix
Dependency Matrix shows dependency and coupling between the projects and their module. NDepend must responsive and easy navigate through the dependencies between the projects. When you click on any cell then it shows graph and information in tooltip manner. I liked this behavior because I do not need to switch between dependency graph and dependency matrix. They are shown in a synchronized way and easy to visualize and analyze the results.
![clip_image012[6]](https://blogger.googleusercontent.com/img/b/R29vZ2xl/AVvXsEi_pzgMPEAB5bwjKXUO_I2ehu65ycXaJxGtIZHBZG7KqK7JNcFKM67wfP6tSi7obzf0bSZOlFj5ASYh8Bzu-BGUwhb6BfCxNE4N8oaDevZj2shM68raLisKCXL0IGQ4mQMsarKRKq8d9-PL/?imgmax=800 "clip_image012[6]")
Dependency Graph
It is an interactive way to represent coupling between the code base elements. Actually NDepend provide this graph for various code exploration scenarios. You can find full description about these in documentation - Exploring Existing Code Architecture in Visual Studio through Dependency Graph.
- Dependency Graph
- Call Graph
- Class Inheritance Graph
- Coupling Graph
- Path Graph
- All Paths Graph
- Cycle Graph
These various type of graphs are accessible from NDepend->Graph menu items.

![clip_image014[6]](https://blogger.googleusercontent.com/img/b/R29vZ2xl/AVvXsEhDUs0zxxelqE9N7CMUUzS1URi_X_CWh_DerlMbqoo6cKCs4eUsJAt0kNvoqvdrLAcSTcJqZQ4EfIRlssyh8ccBdVa3f-owTUZkkXCNgK4nGY_bpaeUyZMSXSqyvgcPm1t_DZNiTlFbnjkC/?imgmax=800 "clip_image014[6]")
Code Metrics View
Code metrics view represents tree-structured data in rectangular blocks format.

Continuous Integration Reporting
These feature matter much analyzing a huge code base. Along with CQLinq, I like NDepend for this feature. NDepend integrate with TFS, Team city etc. in build process to check for the violation of CQLinq rules continuously and these are reported to the development teams to improve the code.
NDepend can analyze source code and .NET assemblies through NDepend.Console.exe. Each time it analyzes a code base, NDepend yields a report that can inform you about the status of our development. As I described in the starting of article about the html document which generated during the analyzing process is generated during build process.
This exe is located in the installation folder and the file name is “NDepend.Console.exe”. It is integrated in the building process by specifying command line arguments.
Conclusion
These are the few features which I have used so far but NDepend is loaded with lots features. In my opinion NDepend is light weight, powerful and intuitive application. Customization with the rules and metrics is an additional advantage using its best part CQLinq. It also integrate with Reflector and other tools which improves the productivity. I found it much better tool for maintaining quality of the application so far. Hope NDepend will continue improving this tool in future and let development process to improvise in easy way.






![image_thumb[9][4]_thumb[2][1]](https://blogger.googleusercontent.com/img/b/R29vZ2xl/AVvXsEgLmavSxDw5X7w8KdDo59jpmPl-hFOsF83kWXweXPnhTQ0bsHektzi8HVB5FAm__UjZE0tO8B0J9FebTTofpV2SNpGxIEWL8plPqKPd58dmAUjReqOufRjwgicw_EB6NimpkjhucyF8YVyI/s1600-h/image_thumb%25255B9%25255D%25255B4%25255D_thumb%25255B2%25255D%25255B1%25255D%25255B3%25255D.png "image_thumb[9][4]_thumb[2][1]")
![image_thumb[10][4]_thumb[3][1]](https://blogger.googleusercontent.com/img/b/R29vZ2xl/AVvXsEjwcElxsMuetjuSZs1j0scBXnMtmfysXQ3uVWp9NQaZDAM5EqSoV1yDIs50Vd7QDL5qDiS5sx29hjdn-zhN8rcpj3HyQnacGwHgBo9b2pRSSbj4Sb_nIWVYbKxAIey0nyipF3XUx2HmOmJ7/s1600-h/image_thumb%25255B10%25255D%25255B4%25255D_thumb%25255B3%25255D%25255B1%25255D%25255B3%25255D.png "image_thumb[10][4]_thumb[3][1]")
![image_thumb13[4]_thumb[1][1]](https://blogger.googleusercontent.com/img/b/R29vZ2xl/AVvXsEi67PyS4fCXgPmq6s8d4GMFeRhZREYF0rEaBIPMKOOO_xVu6BW0VmgKNYy5-RBVSdEKSGgVg8rQoFyMxERIuaqCa3xkF6ZwdfJq1Xc4JGdzvPt1qFO1DN1MHLqwAUldkuzfe6fjL2ivua77/s1600-h/image_thumb13%25255B4%25255D_thumb%25255B1%25255D%25255B1%25255D%25255B3%25255D.png "image_thumb13[4]_thumb[1][1]")
![image_thumb[13][4]_thumb[1][1]](https://blogger.googleusercontent.com/img/b/R29vZ2xl/AVvXsEgpsw29SCAifxQCOYCJxbVIOBh-bkVu5q2TIt9JXYf7mrKV0BfyuBQa2lm9Ue0W-4S2KlE2yH6nqKUfgdI_7W4o-F7pITfkU7OTMagqVasRvw9IVcrfByXKMtZ7IIOPyOfiHg_7Qydf8PFa/s1600-h/image_thumb%25255B13%25255D%25255B4%25255D_thumb%25255B1%25255D%25255B1%25255D%25255B3%25255D.png "image_thumb[13][4]_thumb[1][1]")
![image_thumb15[4]_thumb[1][1]](https://blogger.googleusercontent.com/img/b/R29vZ2xl/AVvXsEj7R92A3ihJNSLEwzeq6TjIVipRY_eCbzVpAKBDWS59AXvf65_ykFRI98UccV1Ki2mXVMwz-tKmQKqA-zLcYQx5iKXKLL90PiipJQMJwIWrNCVjDD6u7FvZ_umjpAPGVW31_25jorvqxD23/s1600-h/image_thumb15%25255B4%25255D_thumb%25255B1%25255D%25255B1%25255D%25255B3%25255D.png "image_thumb15[4]_thumb[1][1]")
![image_thumb[10]_thumb[3][4]](https://blogger.googleusercontent.com/img/b/R29vZ2xl/AVvXsEgWZSE_3IR-QFF-UsveeNxzwkMgbXWpWO6x7kDki5onx-VSt24sY73rCgddNvURs_MVHtnmeCrmBqJX3UsG-rPAG0RzOeZRu1s6sCvAmQ3Gsv8Dopt78Zk-y47Nfgr6Mty4wsx1SLGRANB9/s1600-h/image_thumb%25255B10%25255D_thumb%25255B3%25255D%25255B4%25255D%25255B3%25255D.png "image_thumb[10]_thumb[3][4]")
![image_thumb[16]_thumb[1][4]](https://blogger.googleusercontent.com/img/b/R29vZ2xl/AVvXsEhd3r8RKm6Ng9H2h_aZ-Kb1qlgDCtbV5oF48Epq6rXfasMT8GCjaWdF8O2-j9CTc8rLvXN0acgfz0pxIXbXKJvXY5a94z20iEL0iwiEXCjjgf48U5sI6YFqBTnsQkTgNCCaHnqZJkuUKXVc/s1600-h/image_thumb%25255B16%25255D_thumb%25255B1%25255D%25255B4%25255D%25255B3%25255D.png "image_thumb[16]_thumb[1][4]")
![image_thumb[8][3]](https://blogger.googleusercontent.com/img/b/R29vZ2xl/AVvXsEisX_CigF90jG1h6YdA9qthFygCytrfcHN95DscZS4NbdFQvGqVd8Tg9VNqn-DDUzodOZ0sbEnZfGOW0sV0iNRzME5-rl8UfFQHSZ_tPaVEiEXiDJkxLAdJXgbWkRutE53NY14KdEvIxbyu/s1600-h/image_thumb%25255B8%25255D%25255B3%25255D%25255B4%25255D.png "image_thumb[8][3]")
![image_thumb[24][4]](https://blogger.googleusercontent.com/img/b/R29vZ2xl/AVvXsEhNIEbM-nqCuxgmkN97pdQ6r7-ElxdYx-Y9PMtmdDK-g6R0AQ7ukyrudS0x69dsM8MCmXXxuRpn-LzK2CPhJ0zh_249nC0KPtcVD2nScR_9xPbXRrScCXmS7mvOGHkgmT0dwfsHXuWp2tho/s1600-h/image_thumb%25255B24%25255D%25255B4%25255D%25255B5%25255D.png "image_thumb[24][4]")
![image_thumb[29][4]](https://blogger.googleusercontent.com/img/b/R29vZ2xl/AVvXsEiJYuWAfGwKzGFhH6TXka94Vno9pY3hTOJjZUgh6dG9GpVMFvZPQar5FhZwvTe0gXaSIPFWtCS8zPBY9hYWXy8nQ2QYTPZ56d0hyphenhyphenjFHqtVNATVVH5Jqyq5OeD4OGE2lWDpSEtpGspp-olYN/s1600-h/image_thumb%25255B29%25255D%25255B4%25255D%25255B5%25255D.png "image_thumb[29][4]")
![image_thumb[32][4]](https://blogger.googleusercontent.com/img/b/R29vZ2xl/AVvXsEgDntGiSR6XYJApK_t57egEeLHEFIJ8G755T_SXmdevaPeNJdUA5ta0Oi4MDwGKxsSJTIijqoeJi_H-lvEoO7eA2C8dcXciFQ7AB7-B7tTnxeA7wV3HtcCAzxZBJFlyBEXjTyteQ7bbZdC2/s1600-h/image_thumb%25255B32%25255D%25255B4%25255D%25255B3%25255D.png "image_thumb[32][4]")
![image_thumb[37][4]](https://blogger.googleusercontent.com/img/b/R29vZ2xl/AVvXsEge0EaaTuEp10YHECZhHsKJVVfQO2yuwQR45g2KHBEwaE_0YxocBehQmJuvR4QdO_WcDxxc_KvPWapMRbJJtWuE4PFlHLUudwDuNIHmfzO5I_3R8CVhZvME8_BjnyGSpE_26J8F8k_QyN0D/s1600-h/image_thumb%25255B37%25255D%25255B4%25255D%25255B5%25255D.png "image_thumb[37][4]")


![clip_image003[6]](https://blogger.googleusercontent.com/img/b/R29vZ2xl/AVvXsEhWnwYHqU_UkONd7xkQqs4dBJ7boQvpWFKE7CSmzGmqiirGVjKdYu_Ds5asVZZy31wK5gr4gq-6mbJLDI2KbxYB8tJ-vOWTRA-Uf42lkXjupqM40MhYHUfGTydFu9I9McaEEJ6XRNM4xei7/s1600-h/clip_image00363.png "clip_image003[6]")


![clip_image006[6]](https://blogger.googleusercontent.com/img/b/R29vZ2xl/AVvXsEjeLMbYO-TJE0XB074FGj1ik9aLLI7gOwsGatw9Onkuut1KH2A_zYTIMrQDZKqiEJKGXyT29fKMer8T4fZnyQqSAXwzjzlnFZSX2fpng7UTHbNviTb06XRuxTbw7n9YUVdLdhqw9gNAuZ38/s1600-h/clip_image00663.jpg "clip_image006[6]")

![clip_image008[6]](https://blogger.googleusercontent.com/img/b/R29vZ2xl/AVvXsEgOnlgmAuSa_OWf-rN18KouPnSAGvqfnZbn9JDisFjLgp8h-x3UyISf7x35L-MDjBDJsdmybflSfai2uc5ytW-rrJDSmMHSfpikKcIRs5oNVhWC22QzV0ZQ0u92TYVX15dDFnLLj7aa-CRX/s1600-h/clip_image00863.jpg "clip_image008[6]")

![clip_image010[6]](https://blogger.googleusercontent.com/img/b/R29vZ2xl/AVvXsEg4P15kTXo62VMGO5RWbWpUNdqnOnPPthR2swmFRTDrGrv7CnGy7do2ddauzxQNOu_L1BUM_CGcHcuqWI1XwURuDxHxqXLBZox2ZIYBIRkTWiF8sWlh9I93MZRVsXkIN3q7NlcuXvxiEKHG/s1600-h/clip_image01063.jpg "clip_image010[6]")

![clip_image012[6]](https://blogger.googleusercontent.com/img/b/R29vZ2xl/AVvXsEjy7amfFW9wTGCellb4dOAl7MHIn-MdM1J1_zXBZEELu_gZ7h-V-UwQzZTnOt-cW9_vK4lJGPdPXc3IDB1j3QZBuBv6-jBvUblRDd2rcWW5ytxv938f6MZUMxs-Vru39naWvNKiYNZnyjX8/s1600-h/clip_image01263.jpg "clip_image012[6]")

![clip_image014[6]](https://blogger.googleusercontent.com/img/b/R29vZ2xl/AVvXsEj3k5hv9P-7AggqN_9fN55QDi4oTLdlRKZanzFBEaIuSKALW8S6RaNheKkHAazGNWUBlMKRTJwO9HNFnKlV9y60jB64FfRQC9bKaemzttfGHUZokejsAREK8BgqH87TqUIGZ21YjeJ5r4Gh/s1600-h/clip_image01463.jpg "clip_image014[6]")


